The wonderful unexpected Christmas comet show is over.
Now its time to get you cameras out for the New Year’s Eve fireworks and parties.
see my previous posts on photographing fireworks:
Have a great and safe New Year.

The wonderful unexpected Christmas comet show is over.
Now its time to get you cameras out for the New Year’s Eve fireworks and parties.
see my previous posts on photographing fireworks:
Have a great and safe New Year.
Surprisingly, Comet C/2011 W3 Lovejoy, a Kreutz sungrazer comet which was only discovered in November 2011 by Brisbane amateur astronomer, Terry Lovejoy, passed through the sun’s corona earlier this week and is now putting on a dazzling display at 3.30-4.30am daylight saving time in the southern hemisphere before sunrise twilight interferes.
It is currently showing a 22 deg tail which is up to 2 deg wide and is visible to the naked eye above the south east horizon, but it seems it is getting dimmer each day and so you would be best to get away from cities and their light pollution.
If you are planning on photographing it, a focal length equivalent to 50mm-80mm in 35mm full frame terms is all you need, preferably with wide aperture of f/1.4-2.8 range and if you need a shutter speed longer than 15-20secs, then an equatorial mount rather than tripod would be advisable.
It has been difficult to see in Melbourne due to cloud conditions.
Here is the path of the comet for the next 2 weeks heading almost straight for the South Celestial Pole!
It has been very amenable to photograph even without an equatorial mount given its brightness but this may change soon.
Here is an example photograph from Adam Marsh, an Australian in Tocumwal, NSW taken with a Canon 1000D with Olympus OM 50mm f/1.8 lens at ISO 1600 with a 13sec exposure:

The comet will pass near the Pointers in Centurus and become circumpolar which means for southern viewers it will be visible ALL night long but unfortunately dimmer each night as it travels away from the sun.
see this forum for more info on this comet .
see my webpage on comets for more info on photographing comets.
see BOM cloud forecast to help you decide where to go to see the comet bearing in mind you don’t want light pollution in the south east – note that for 4am Melbourne time, you need 1700UTC for the PREVIOUS day as Melbourne daylight savings time is UTC+11hrs. Be aware you may also need to contend with local fog.
Paul Albers has posted a shot from this morning taken at Cape Schanck:

Phil Hart has a pictorial blog post on the comet here.
A beautifully composed shot by Alex Cherney at Cape Schanck using Nikon D700, 14-24mm lens at f/2.8, ISO 3200, 30sec:

Update 26th Dec 2011:
John Drummond from NZ took this fantastic image on 26th Dec, 28sec exposure at f/2.8, 12800 ISO using a 20mm f/2.8 lens on a Canon 500D showing the tail is actually getting longer – now 27deg long and 3 deg wide!:

Update 27th Dec 2011:
Tail now has lengthened to a visual length of ~35deg but currently is overlying the bright Milky Way making it harder to see well and giving it more of a ghostly appearance. It should move out of the Milky Way region over the next few days and hopefully will be more visible then.
Image by Adam Marsh 27th Dec morning using Canon 1000D,18mm f/3.5 lens, ISO 1600 as comet tail approaches the Pointers:

Update 31st Dec 2011:
The comet has now moved out of the brightest parts of the Milky Way which hindered viewing the last few days, but unfortunately has suddenly became a lot dimmer and is now a little less bright than the Magellanic Clouds and only just visible to naked eye away from pollution and with a visible tail at least 15deg long. Imaging is possible on a tripod with a standard lens at f/1.8, ISO 1600 for 30sec exposure. It is now circum polar and visible in the evening although low in the southern horizon in southern Australia and NZ. It is still best viewed after 3am, but really, the show is now over other than for astrophotographers, and even those will have issues once the moon is in the sky.
Stuart’s annotated photo on the morning of 31st Dec taken from Mt Macedon showing light pollution from Melbourne and Gisborne:

If you get to a dark sky, such as this time lapse video by James from Pambula, NSW on the morning of 31st Dec, it still makes a reasonable photographic subject:
My image of the now almost invisible comet taken 2nd Jan 2012 using a Canon 1D Mark III, 50mm lens at f2.2, 2 minute exposure and ISO 1600 can be seen on my Flickr account.
Now a timelapse sequence of the comet over 6 days taken from the Gippssland Lakes by Phil Hart:
Six days of Comet Lovejoy from Phil Hart on Vimeo.
Please note that the above images are copyright to their respective photographers.
If you are upgrading from a point and shoot digital camera you have 2 main options:
BOTH will give you almost the same image quality which is FAR better than point and shoots and BOTH will give you the versatility of interchangable lenses and external flash.
These make great gift ideas for the new photographer.
Circular polarising lens of the correct size for each of your lenses which you will use outdoors.
Cokin neutral soft half gradient filter 0.6 to make the stormy clouds really come out.
Medium size external flash which rotates for bouncing off walls – eg. Olympus FL-36 for Micro Four Thirds, – see tips for better Christmas party photos
Sturdy tripod if you intend to do night shots, flowing water shots such as waterfalls or at the beach at dusk.
A translation of an interview with Haruo Ogawa, Olympus marketing division director has been posted on the dpreview.com forums and points to an exciting future with Olympus now that the corporate issues appear to have been addressed.
The key points in the interview seem to be:
Olympus are working on a new style of Micro Four Thirds camera which will target advanced photographers and have a superb built-in EVF at last.
The current PEN range without built-in EVF were apparently designed to market to the “camera joshi,” [literally, “camera girls”] who want retro styling.
But as I have said many times on my blog, I want a built-in viewfinder – I do not like composing and taking photos using the LCD screen – so maybe at last they will come up with a very innovative camera more to my liking.
Olympus are also working on a successor to the E-5 dSLR.
This is fanatastic news as personally, I believe they do not upgrade their high end dSLRs rapidly enough and they fall behind the competition too quickly.
That said, there is nothing in the Canon or Nikon world that gives me the same features of an Olympus E-5 with a ZD 50-200mm f/2.8-3.5 SWD lens – this is just a brilliant combination giving a much lighter 100-400mm wide aperture zoom than is possible on Canon or Nikon and it is weathersealed and has closer focusing. Plus you can use a EC-20 2x teleconverter to hand hold with the built-in image satbilisation of the body a 200-800mm f/5.6-7 zoom in which AF still works.
The news is also great because many have feared Four Thirds is looking like a dead end, but while the keep progressing the high end dSLR at least, there is good reason to stick with it for those who have already invested in the lenses.
Indoor Christmas party photos can be a very trying issue for the social photographer.
Sure you can use a point and shoot digital with its built-in flash and get the usual shots, but what about aiming for a bit more flattering portraiture without taking a studio lighting kit with you?
Now, the above kit could work well without the flash even indoors IF you have nice flattering lighting for your portraits such as window light or a light hitting the face at a 45deg angle.
More often than not, venues will have very unflattering and often quite dim lighting – downlights are among the worst for flattering portraits unless you position your subject very carefully indeed.
Faced with difficult lighting, your best option for easy to achieve nice portraits indoors is to put a nice powerful flash on your camera and swivel its head so that it bounces off the cornice region of the wall behind you or to the side of you. BUT you do need relatively light and relatively colour neutral paintwork to bounce off – if its is natural wood panels, forget this option!
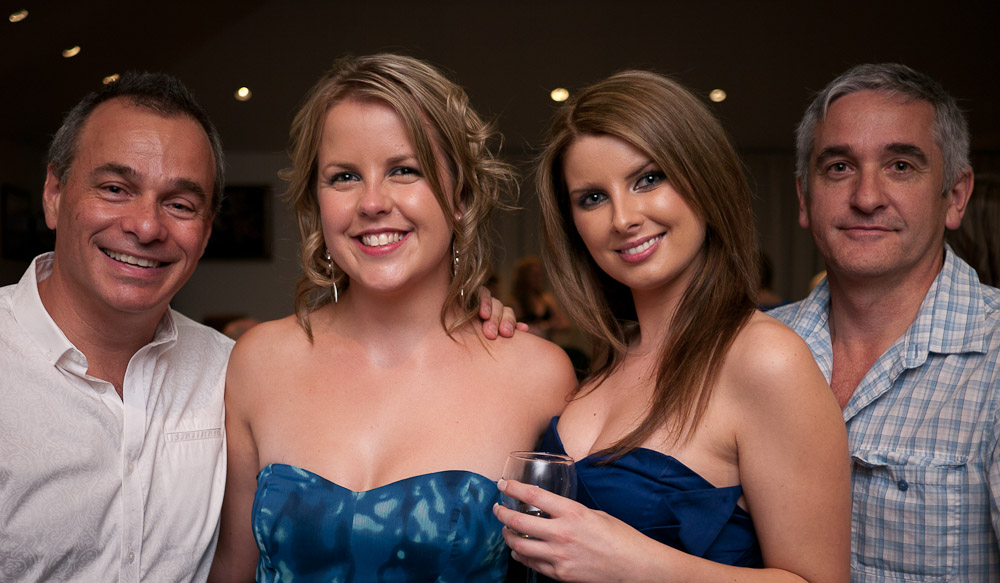
Here is a QUICK impromptu snap of my friends using this method at f/1.7 using the Panasonic 20mm f/1.7 pancake lens – my “party lens”:
If the room ambient lighting in the background is too dark for your liking, just play with the shutter speed – the longer the shutter speed using the above technique, the more ambient light you allow and the lighter the background will be.
If you are using a wide-normal lens like the 20mm f/1.7 pancake, avoid getting too close to your subjects as this will cause unflattering distortion making their noses appear larger than they are, etc, so stay at least 1.5 – 2m away, and if need be, crop your images later.
Also be careful of arms coming towards you such as resting on a chair, as these will also gain an unflattering distortion.
Your friends will be blown away with the quality of your photos – far better than point and shoot cameras with inbuilt flash and as good as dSLRs.
They will then likely say wow, what camera did you use to take those with – instead of saying what a great photographer you are – but that’s life – people treat photography quite differently to music – they would not dare say, wow, that sounded great, what brand piano did you use?
If you do not have an external flash, then you will have to settle for harsh, direct on-camera flash in the same manner as a point and shoot shot – just use the above settings but DON’T FORGET to POP UP the built-in flash!
Then once everyone realises that you are a brilliant photographer capable of making them look good, inevitably you will be asked to do the group shot.
Now, in a dim room, with downlights, a group shot with minimal equipment could be hard to pull off well.
But not with the above kit and a bouncable ceiling, a great photo is easy to achieve, just step back far enough to get everyone in making sure that your flash can aim at the ceiling well in front of the group (you may need a decent flash for this or increase your ISO and open your aperture to get enough light from your flash).
SCN mode “Party”:
Portrait mode:
iA exposure mode – the “dummies” mode:
“A” exposure mode – aperture priority:
“P” exposure mode – programmed mode:
“S” exposure mode – shutter priority:
My conclusions:
The announcement today by Olympus of this new Micro Four Thirds system zoom lens is exciting because it is the 1st Micro Four Thirds lens to be weatherproofed and thus signals a long awaited weatherproofed high end Micro Four Thirds Olympus camera is on the way – assuming Olympus survives its current corporate turmoils.
The Olympus m.Zuiko digital ED 12-50mm f/3.5-6.3 EZ macro power-zoom video-optimised MSC lens.
Olympus generally tend to judge the lens market quite well and assuming it is as good optically as we have come to expect from Olympus, I think this lens will find a lot of fans once they get over the f/6.3 psychological hurdle.
To me it makes a lot of sense as a general kit lens and gives users another very handy option indeed, and if they offset the f/6.3 issue with a 45mm f/1.8 portrait lens then they will have a very useful compact kit indeed.
On the other hand there will be a lot of users like me who just want the near impossible, a 12-50mm constant f/2.8 weatherproofed lens with macro in the same size lens but for $699 – that is just not likely to happen. Olympus do have the excellent 14-54mm f/2.8-3.5 Four Thirds lens but this is substantially bigger and heavier.
I could imagine a downhill snow ski videographer mounting a compact weatherproofed Micro Four Thirds camera with this lens onto his helmet to shoot some very exciting video sequences.
The f/6.3 aperture would not be an issue as he would be wanting a reasonable amount of depth of field.
The AF lock could be crucial so he could lock focus before he starts and know that all the motion is not going to upset the focus point, and AF on a rapidly moving camera is not going to be very successful anyway. I am assuming this L-Fn will operate like this as there is little detail regarding this function – of course, it may just be what it says, if you think someone is about to walk between you and the subject, you just press this button and AF is temporarily suspended to avoid change in focus. The question is for how long is AF suspended – until you take your finger off, for a specified time interval, or until you press it again?
The large power zoom ring would be very easy to operate with gloves so he could quickly adjust his field of view.
The weatherproofing obviously becomes a critical feature in such conditions.
So many great kit lenses for Micro Four Thirds users – kind of puts the kit lenses for entry level Canon dSLRs to shame in terms of optical quality and build quality – just head over to lens reviews on dpreview.com to compare the optical performances to see what I’m talking about.
Now, to eagerly await a weatherproof camera from Olympus to match the lens!
More info here.
See here for more Micro Four Thirds lenses.
Please Mr Olympus, can I have the Rokinon 85mm f/1.4 in a more compact, Micro Four Thirds autofocus version, if not, a 100mm f/2.0 would be brilliant.
Many people will be upgrading from point and shoot digital cameras to mirrorless cameras with much larger sensors and better image quality this Christmas.
One of the best to go for this Christmas is the Panasonic GH-2 or the more affordable Panasonic G3 Micro Four Thirds camera.
Most of the following tips will also apply to the excellent Olympus Micro Four Thirds cameras such as the E-P3 or E-PL3.
Most will buy the twin kit lenses although some will opt for just one 3x zoom lens or perhaps the 10x zoom lens.
The Panasonic and Olympus kit lenses are actually very good lenses and well worth having, but like all kit lenses, are really only useful in bright conditions such as outdoors. They are substantially better optically than the Canon kit lenses which not only are much larger, but have the extremely annoying problem of the front element rotating as you focus making use of polarising filters and gradient fiters much more frustrating.
Beginners will initially resort to the iA camera mode (intelligent auto mode which tries to determine the best settings for the scene it detects).
This is fine until you get used to using your camera and you start to understand ISO, aperture, shutter speed, exposure compensation and depth of field.
Some basics of photography:
As good as the iA mode is, it can’t determine what YOU would like your images to look like, so let’s look at a few tips for better photos with these cameras.
Click here for more tips on taking better photos including some basic rules of composition.
We all want a little memento of the concerts we pay lots of money to attend and enjoy but taking a reasonable photo from 100m or more away is challenging given the constraints imposed by the concert venue – in particular – most only allow photos from “small digital cameras” and ban videos.
Don’t bother bringing a dSLR or large lenses – the security staff will almost certainly ask you to put it away.
Simple point and shoot cameras with their tiny sensors and minimal telephoto zoom reach are not going to get very good quality shots unless you are lucky enough to get to the mosh pit near the stage.
My solution which pushes the venue limits and may still require some discretion, in particular, you do not want security staff to be given the impression your are doing long sequences of video as that would be banned no matter what camera or lens you use.
The best compromise then is a small, compact mirrorless camera with a built-in electronic viewfinder (you do NOT want to be distracting everyone with bright light coming from an LCD screen – use the viewfinder to do everything).
I use a Panasonic GH-1 Micro Four Thirds camera although even this is probably getting a bit big for venue staff – a smaller mirrorless camera such as a Olympus E-PL3 with the optional viewfinder may be a better option, and the Olympus cameras have the added benefit of built-in image stabilisation which can be useful in this situation where you will be using relatively slow shutter speeds of 1/125th second for 200-270mm telephoto reach at ISO 800.
The newer Sony NEX mirrorless cameras (eg. Sony NEX 5n or NEX 7) could be used if they have an electronic viewfinder but they have the disadvantage compared to Micro Four Thirds in that the same size lens does not give you as much zoom – and for this, you want as much telephoto reach as possible from your lens. Furthermore, they do not have built-in image stabiliser like the Olympus cameras do.
Next step is to choose a lens to use which will give you enough telephoto reach without being too large that venue staff will object.
My preference is a legacy manual focus Olympus OM lens with wide aperture.
Olympus OM because they are among the most compact lenses you can get.
Manual focus lens because, I like to manually focus and then just leave it carefully in that focus position so I can just pick the camera up, turn it on and I am ready to capture a key moment without having to worry about focus – autofocus lenses may struggle in many concert lighting conditions and may cause you to miss your shot.
The Olympus OM 135mm f/2.8 lens is probably the largest lens you can get away with and this gives you sufficient telephoto reach for a large concert venue while the f/2.8 aperture allows you to keep ISO around 800 and shutter speed around 1/125th – 1/200th sec.
If you know you will be a bit closer to the stage, the Olympus OM 100mm f/2.8 lens is smaller and much more likely to be acceptable to venue staff.
Firstly make sure it will NOT be firing the flash – flash will be useless at such distances, it will drain your battery and it is really, really annoying to everyone else.
Set your ISO to ISO 800 – a lower ISO will mean shutter speed will be too slow for hand held telephoto shots and you will end up with too much camera shake.
If your camera is an Olympus, set image stabiliser to the focal length of the lens you are using – assuming it is a legacy lens such as an Olympus OM lens.
Next, set your exposure mode to MANUAL and with your lens wide open (eg. f/2.8), take a few shots at different shutter speeds until the exposure of the faces on the stage under the stage lighting looks adequate – this will be something like 1/125th sec.
Finally, use magnified view to accurately focus your lens on the stage.
Then you are ready to go.
These images have not been cropped and have not had any post-processing (except colour adjustment in the last one) other than resize to web size and the default Lightroom export sharpening for screen.

Elton John in concert, Melbourne 2011
Taken from a long way back using Panasonic GH-1 with Olympus OM 135mm f/2.8 lens.


Version 1.1 firmware update includes:
* Available with LUMIX G X VARIO PZ 45-175mm / F4.0-5.6 ASPH. / POWER O.I.S. only.
It would seem some of these upgrades are derived from Panasonic G3 (eg. improved noise reduction).
Most people with little photographic knowledge who currently use point and shoot digital cameras and who want to upgrade to a better camera do so for one or more of the following reasons:
Unfortunately, there is no one camera that suits every purpose best, and worse, the more versatile and capable the camera, the more complex it is to use and thus the LESS SUITABLE it is for a beginner who does not understand complicated basic concepts of exposure, ISO, aperture, shutter speed, focal length, let alone the myriad of settings which can be set on the more advanced cameras.
Many think that just by purchasing a dSLR they will get better photos, but the truth is more that they need to spend much time and thought understanding and practicing and experimenting with the basics.
Furthermore, they are likely to be sold a dSLR with one or two “kit” lenses which in reality will give them photos that “look” much like their photos from their point and shoot cameras. This is because they are expecting to automatically get ability to blur the background like the pros do, but the kit lenses at f/3.5-5.6 are just not going to give them that capability unless they are shooting with a telephoto at a subject at close range.
If you want to blur the background you need a lens with f number of f/2.8 or a smaller number (eg. f/1.8, f/1.7 or f/1.4) and no portrait zoom kit lens is like this. Those lovely wedding photos pros take, are often shot with lenses such as a 70-200mm f/2.8 IS which will set you back over $2000 for just the lens, but you could achieve similar results with a cheaper pro lens such as a 135mm f/2.0 lens but this still costs over $1000 for just the lens. I don’t like carrying big expensive lenses like these around, so I achieve the same image quality with a cheap manual focus lens, the Rokinon 85mm f/1.4 ($265).
They also may not realise that unlike the days of film when cameras were an investment and lasted 30 years or so, their new dSLR is likely to be needing replacement in only 5 years – ouch!
Despite this, if the prime aim is to shoot fast moving subjects, then at this moment in time, the dSLR is the way to go, and preferably one designed for such shots and unfortunately, this means at least a mid-range camera which will set you back around $1500-2000, and higher if one wants a weatherproofed model which won’t die if it gets some rain on it.
Most beginners, would be best settling on a camera that will be small and light enough they will actually take it with them and learn to love experimenting with it without it being intrusive and embarassing for them to use at social events.
The best type of camera for most of these beginners is a “mirrorless” camera – quieter, smaller, lighter and generally easier to use than a dSLR, but still able to give the same image quality (or close enough that it does not matter) and still get the ability to blur the background.
If you need some convincing that such a camera will be adequate, check out some of my photos taken with a Panasonic GH-1 from around the world and you can see it is a very capable and versatile camera indeed.
While Nikon has just introduced their version of this style of camera, it has a smaller sensor and it will be not as suitable for blurring the background as the other brands which I will thus concentrate on.
Essentially, there are 3 brands I would look at for the beginner looking to upgrade from a point and shoot, and 2 of these (Panasonic and Olympus) share the same lens mount technology (“Micro Four Thirds”) which means there are LOTS of lenses and camera models available to choose from. The 3rd brand is Sony (sorry Canon has not yet developed a camera in this style).
ALL of these cameras have a good enough image quality and number of pixels to satisfy the vast majority of users so let’s forget about this aspect as nitpicking can get confusing and there are pros and cons which in the end do not matter that much to most people.
The MOST important consideration is what lenses to buy and can you afford them and how big are they.
The new Sony NEX 5n and NEX 7 are very nice cameras but unfortunately, unlikely to be available before Christmas 2011 due to flooding destroying their factory in Thailand. Furthermore Sony lenses are larger, heavier and there are only a few to choose from at this stage.
That leaves us with Panasonic and Olympus Micro Four Thirds.
Olympus at present is having major corporate issues but this would not stop me buying Olympus Micro Four Thirds products as the presence of Panasonic reduces your risk substantially.
My favourite cost effective Micro Four Thirds camera at present is the Panasonic G3 (I own the older GH-1, and would love the even better GH-2 but this is quite expensive), but if you plan to do a lot of photography on the cheap using old 2nd hand manual focus lenses, then I would strongly consider one of the new Olympus models (eg. E-P3 or E-PL3).
The Panasonic G3 with 14-42mm kit lens sells for $599 in the US but it is a ridiculous $849 in Australia – thanks for ripping us off Panasonic Australia!
See my comparisons of these here and you can see that within these cameras you have quite a range of choices including:
Cameras with built-in viewfinder and flip-out rotatable LCD screen for self-portraits:
More compact cameras with optional add-on viewfinder:
Very compact “simplified”, less capable and cheaper cameras:
Your next decision is which lens to get.
Most people will probably get the twin lens kit because the deals are usually quite good value for money and they make great daylight travel photography lenses.
BUT as I alluded to above, the kit lenses are not always going to give you what you want, and particularly in low light or indoors, they will not be very helpful, so IN ADDITION to these kit lens, you should strongly consider getting a low light lens for indoors or evenings.
Now for most young ladies who love to do hand held self-portraits or would like to do those party shots indoors withot having to use a flash, then a Panasonic G3 with its flip-out rotatable LCD screen combined with a Panasonic 20mm f/1.7 lens will get you those shots and capture them with beautifully sharp imagery whilst still having some background blurring, and you can do it with face recognition auto-focus – something that is not readily available on a dSLR!
This 20mm f/1.7 lens is ridiculously expensive in Australia even at the reduced price of $599 – try to get a 2nd hand one in Australia for under $350, or get one from overseas – they sell for well under $400 brand new elsewhere. This lens though is tiny and will be a pleasure to carry in your hand bag, but it does not have any zoom – you can’t have everything!
This 20mm f/1.7 lens is great for candid photography, parties and other social events, and fantastic for walking the streets at night – and in all cases, the f/1.7 aperture means you just need to bump the ISO to 400 or 800 and you can do all this without having to resort to using your flash – now you can’t do that with a point and shoot and get the same image quality!
The Lumix 20mm f/1.7 hand held at night last night:

Now if you have the money, you could get the even better but bigger Panasonic 25mm f/1.4 lens instead of the 20mm f/1.7 lens.
Other lenses to strongly consider:
Do yourself a BIG favor and take the time to try to understand the basic concepts of photography such as ISO, shutter speed, aperture, lens focal lengths so then you can take your camera for a real ride and get the photos that you want rather than the photos the default auto setting on the camera will give you.
All the modern cameras are capable of taking great photos, the limiting factor is most likely to be you,the subject and most importantly the lighting on the subject – but if you haven’t got your camera with you, you will not get any photo at all – hence, aim for the smallest, lightest camera that will do what YOU need – not what the guy in the camera shop needs.
I also have a comparison of Canon 550D vs Canon 7D dSLRs vs Panasonic GH-1 camera here which some may be interested in the general principles of the pros and cons – it all comes down to the lenses!


