May 23rd, 2012

...now browsing by day


The Olympus OM-D E-M5 makes hand held infrared photography easier

Wednesday, May 23rd, 2012

Last week I went on a road trip to outback Australia to play with my new Olympus OM-D E-M5 Micro Four Thirds camera and primarily used it with the lovely but moderately expensive Olympus m.Zuiko Digital 12mm f/2.0 lens.

I love infrared photography and use a Hoya R72 infrared filter as my main IR filter.

This article is NOT about using a modified camera with IR blocking filter removed but an E-M5 straight from the retailer.

Unfortunately, using an optical viewfinder as on dSLRs makes hand held use almost impossible as the filter is so dark there is little that can be seen through it unless pointed at the brightest of scenes.

Furthermore, the reduction in light requires either long exposures or high ISO, even with wide aperture f/2.0 lenses.

I was just able to achieve reasonable hand held IR shots with my Panasonic GH-1 combined with the Panasonic Leica-D 25mm f/1.4 lens at f/1.4 in bright sunlight, but the amazing E-M5 takes IR even further thanks to its built-in image stabilisation system, and much better image quality at high ISO.

Hand held infrared with the E-M5 becomes a fun enjoyable experience as long as you have a relatively bright scene, a Hoya R72 filter and a f/2.8 or wider aperture lens.

So let’s see what can be done in the bright sun in outback Australia with its blue skies (although unfortunately, few trees to show off the Wood’s effects):

IR Silverton Hotel
This is essentially straight from the camera (although cropped in Lightroom a touch).

Shot details: Olympus 12mm f/2.0 lens at f/2.8 with ISO 400 and shutter 1/8th sec hand held.

Broken Hill sculptures at sunset:

IR Broken Hill sculptures at sunset

The above shot was with Olympus 12mm f/2.0 lens at f/2.8 with ISO 400 and shutter 1/6th sec hand held and was processed in Lightoom with split toning to provide the sunset tones instead of B&W.

Shearing shed on shores of the fossilised 18,000 year dry Lake Mungo:

IR shearing shed on shores of the fossilised 18,000 year dry Lake Mungo

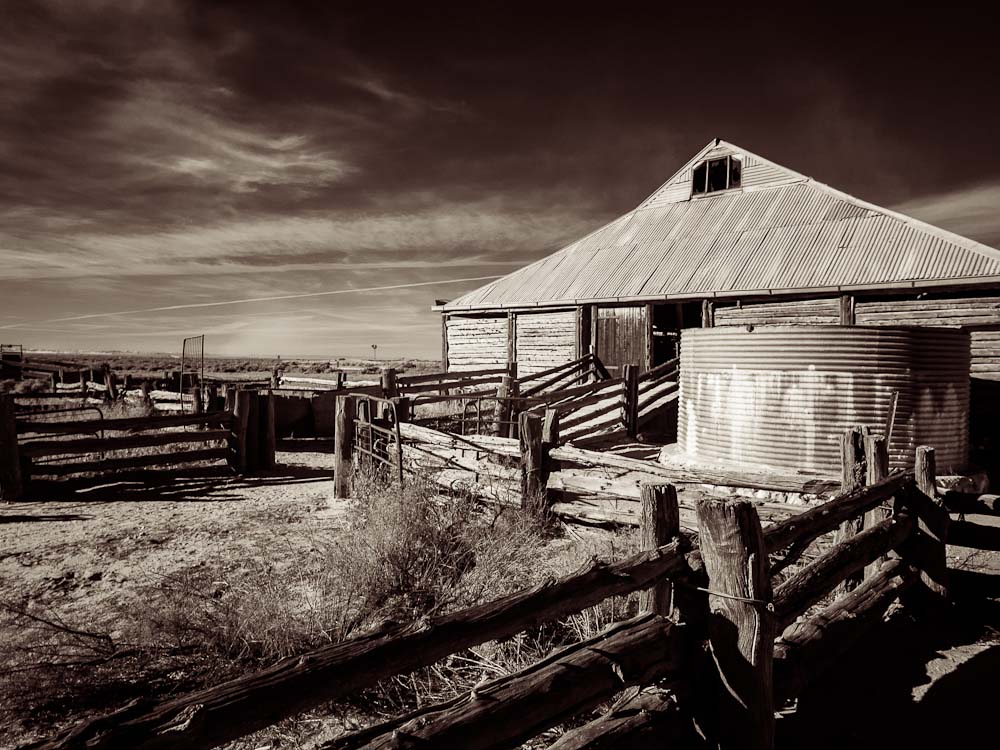
The above shot is my favorite, and one of the few times during the week that there was actually some clouds in the sky.

It was shot with Olympus 12mm f/2.0 lens at f/4 with ISO 400 and shutter 1/5th sec hand held and was processed in Lightoom with split toning to provide the sepia-like toning instead of B&W.

Setting up the Olympus E-M5 for B&W IR shots straight from the camera:

  • set Picture Mode to Monotone with Contrast +2 (I like contrasty IR shots), and B&W filter to Red. Of course you can play with these further and add Pict. Tone of Sepia instead of Neutral.
  • set ISO to 200-400 for sunny scenes
  • set exposure mode to aperture priority and choose a wide aperture to give a fast enough shutter speed (remember the 12mm lens on the E-M5 you could use even down to half a second with care hand held!) but sufficient depth of field (eg. f/2.8)
  • ensure IS is set to IS1
  • adjust exposure compensation so that you minimise blown out highlights as these tend to create hot spots from IR flare within the lens (I often use minus 0.5 to minus 0.7)
  • place the IR filter on the lens
  • you can easily compose and autofocus even with the IR filter in place – just awesome!

The Olympus OM-D E-M5 makes astrophotography easier

Wednesday, May 23rd, 2012

Last week I went on a road trip to outback Australia to play with my new Olympus OM-D E-M5 Micro Four Thirds camera and primarily used it with the lovely but moderately expensive Olympus m.Zuiko Digital 12mm f/2.0 lens.

Part of camping out in the beautiful night skies of the remote regions of Australia well away from light pollution of the cities is to just lie back and observe the myriad stars while waiting for meteors – fantastic in the desert regions in May where there are no mosquitoes to annoy you and the night is not yet too cold as to be uncomfortable.

What better time to see how this amazing camera can make astrophotography easier.

Unfortunately, I did not bring my telescope mount to provide guided long exposures and so had to limit myself to tripod mounted long exposures.

How does the E-M5 make life easier for astrophotography?

  1. no mirror, so no need to remember to set mirror lockup to prevent camera shake
  2. no mirror, so live view is easy to use
  3. flip out LCD avoids having to strain looking at awkward angles, particularly when shooting straight upwards
  4. AF is good enough to AF on bright stars as long as the sky is dark and offering good contrast and you have a wide aperture lens such as f/2.0
  5. touch LCD can be set to AF only thus makes it easier to AF on a bright star instead of having to manually move the AF region onto the star
  6. magnified manual focus is easy to use if AF does not work
  7. can set Live Boost ON to make it easier to see the fainter stars on the LCD
  8. can use Live BULB so that they can see the image forming during long exposures – very handy to check that you have the composition correct and abort the exposure if it isn’t instead of waiting a full 1-2 minutes to find out
  9. NR ON automatically performs a dark frame subtraction for long exposures
  10. ISO 1600 is VERY usable
  11. timed shutter speeds extend to 60secs in manual mode (most cameras only go to 30secs which is inadequate for most astrophotography)
  12. can set a timed limit to BULB and Live TIME of 1, 2, 4, 8, 15, 20, 25, or 30 minutes – very few cameras have this feature
  13. camera is light so that mounting it on telescopes causes less issues with weight balancing compared to a full frame dSLR
  14. can use a remote cable and set drive mode to continuous and AntiShock to the interval between exposures to work as an intervalometer
  15. can attach a TriggerTrap cable and use your iPod or iPhone to control intervalometer aspects
  16. can use almost any lens ever made (via adapters) as well as direct attachment to eyepiece of telescopes (via M43-T2 adapters)

One of the holy grails of astrophotographers is to find a wide angle lens that captures stars as points instead of with the usual spherocoma and astigmatism aberrations which are a characteristic of nearly all wide angle lenses.

My main aspiration of this test was to see how the AF and MF worked as well as to determine if the Olympus 12mm f/2.0 would perform in this very demanding domain.

During my trip I found the Olympus 12mm to be superb for most of my needs such as hand held infrared photography, hand held urban night street scenes, and general travel photography but like nearly every other wide angle lens ever made, it too was not optimised for astrophotography and the over-exposed brighter stars had the very annoying coma and astigmatism with purple CA in the coma aberration:

Milky Way with Southern Cross and Centaurus on top right and Scorpius bottom left: Olympus 12mm at f/2.0 ISO 1600 20 secs (click for larger view):
Milky Way 12mm at f/2.0 ISO 1600 20secs
Note that I did play with contrast a bit on this image but I did not do any CA correction.

So as lovely as this lens is, and with the very nice switchable manual focus controls, it is a useful but not brilliant, astrophotography lens.

Full frame astrophotographers generally resort to expensive wide angle lenses such as the Zeiss 21mm f/2.8, although I have heard the Samyang/Rokinon 14mm f/2.8 does an admirable job and is very cheap in comparison, so this lens may be the answer for Micro Four Thirds users needing a wider angle than a Panasonic Leica-D 25mm f/1.4.

I also briefly tested the Olympus m.ZD 45mm f/1.8 lens and this performed better but still had CA around the bright stars and there was some coma and astigmatism in the corners. Unfortunately, the focal length of this lens means tripod mounted images are restricted to about 8-10secs to avoid obvious star trailing.

For those who are interested, THIS LINK will open a full jpeg straight from camera of a dark frame at room temperature (~16degC) from the E-M5 taken at ISO 1600 and 60secs exposure with no dark frame subtratction (NR = OFF) and Noise Filter = LOW.

Now I will be even better prepared for the next bright comet that comes our way, here is a manually guided image of Comet McNaught I took with an Olympus E330 and an Olympus OM 50mm lens in January 2007:

Comet McNaught