
Much of this post is a repeat of my blog post of my detailed long use review of the similar but smaller Oztrail 4P Fast Frame Blockout Tent much of which also applies to this tent but there are some differences which I will highlight here as well as comment on the Blockout on a hot sunny 34degC Australian summer day.
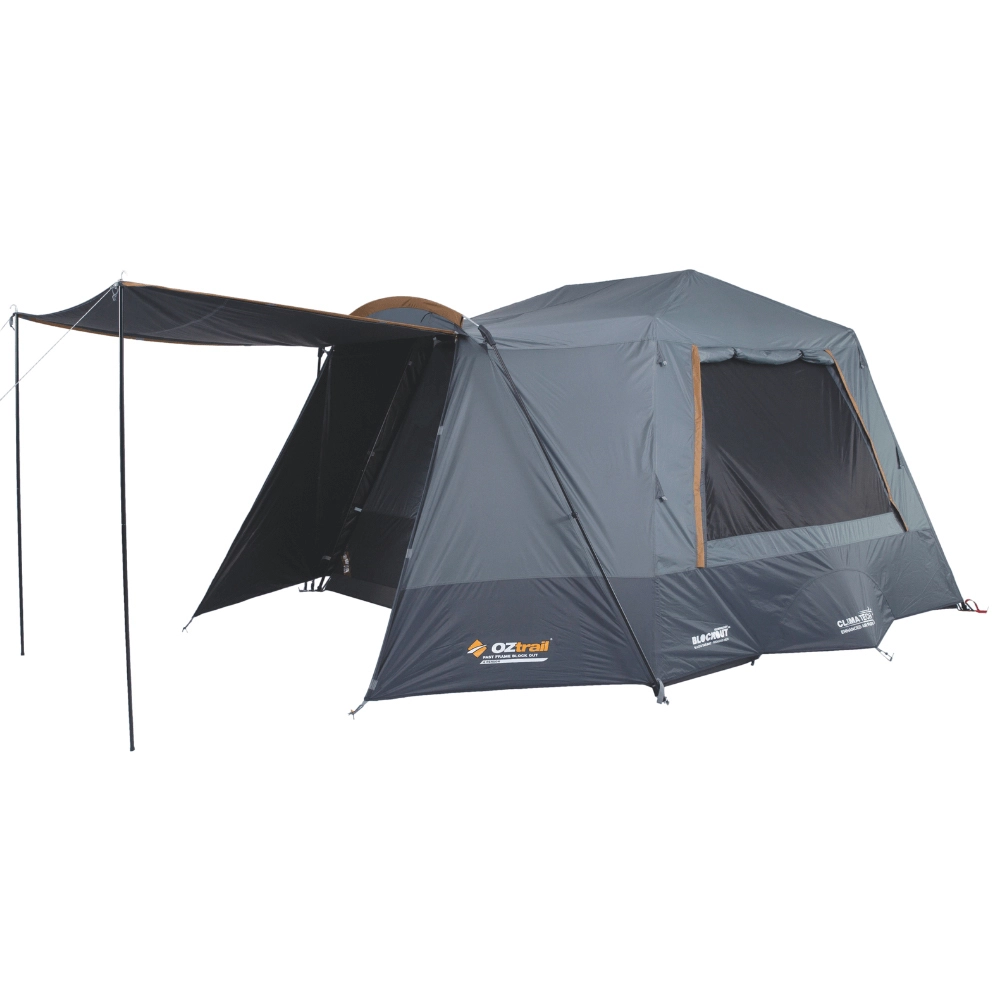
This “6 person” tent is a touring style tent designed with a fast set up frame and the fly has an extra layer to blockout sunlight or other lights which makes it cooler to be in during the day time and a good option for festival goers as well as those traveling to summer camp sites by car.
Being a touring tent it allows one to stand inside the tent and has a porch with awning.
What makes it stand apart from many other touring tents is the large rear door with awning, the Blockout layer for a Dark Tent functionality and the almost fully mesh ceiling of the inner tent.
A rear door and awning gives you a potentially important second exit point (imagine a fire in the front vestibule, or a snake entering the tent) and gives you much more versatility if the weather changes direction.
Most good quality polyester tents such as this one should last at least 5-10 years depending upon use, UV exposure and storage. For better durability than polyester tents, you could consider various canvas options but these tents rarely have a rear door and are MUCH heavier and much more expensive.
For those looking for a 10P tent, I personally would prefer to have two 6P tents or one 6P and one 4P as this makes for a much more versatile set up – you can opt to just take one tent when needed, each of the 4P and 6P tents can be set up by one person and the component weights are much reduced saving your back, while you have more flexibility in choosing camp sites as they don’t need to be as large, plus you can create some spacial separation from the snorers! Finally, if one tent fails, you still have another functioning tent.
Disclaimer: I purchased my tent online and have not been sponsored by any party in relation to this tent and I have used it only for the one night in a storm with up to 60-80kph wind gusts with only the inner frame without the fly on as it was a hot night and not forecast to rain.

Inner canopy with fast frame being set up – just open the legs outwards as above, then bend the leg hinges to the opposite direction as they are in the photo, then extend the legs to reach full set up – very easy! I managed to do this by myself in reasonable winds even though the instructions state it needs at least two people, and I managed to take it down by myself in 60kph plus wind gusts with ease.

Inner canopy set up showing the front door (the rear door has red corner pole holders). If a strong wind were to push two walls inwards making the frame hinge angle the opposite way, the frame will collapse. Hence the importance of the fly being attached to the frame and guy ropes preventing the walls being pushed inwards.
In my testing, as very strong winds came up unexpectedly overnight with no fly on, I managed to secure the inner tent without the fly with 4 good guy ropes attached to just above the elbow joint of each frame leg and this really stabilised the tent very well and it survived several hours of these wind gusts until I decided not to push my luck and take it down. I did have all window and doors mesh only to minimise the wind resistance.
Set up tips
When packing the inner frame, ensure you do it without tangling legs etc up otherwise you may take an hour to work out how to get it set up again! This is an issue as trying to dry the floor out can easily result in everything getting tangled up! Do this in an orderly manner when possible.
Lay out the inner tent on the ground with frame hub UPWARDS (flat surface of the hub faces the ground!) on TOP of the floor, and the red buckle straps where you would like the REAR door to be then open out the legs then unfold each leg 270deg so that they will end up standing on the ground.
Extend each leg until they lock into place with the locking pin.
Pull out each leg so the floor is stretched out taut between them then peg them down (if it is very windy you may wish to do this before extending the legs). Peg out the centre of the rear and front floor.
Insert two fly buckles into the buckle corners at the windiest end, then throw the fly over the top of the tent (if this is a struggle you may need to lower the legs first) and buckle in the remaining two corners.
Adjust the fly position so that seams match the top frame arms and go under the fly to attach the internal velcro attachments to the legs.
Under the pockets which hold the two front vestibule pole supports and insert the front vestibule cross pole through the vestibule tunnel and attach the pole supports at each end. Then attach the two main vestibule poles to the pole support and the provided ground pin of the inner tent.
Guy out the fly as desired and optionally set up as an awning with the awning poles at either the front or rear.
Finally, insert the rear vestibule pole into the two eyelets at the rear of the inner frame to give more head room at the rear awning section (consider using an external clamp to hold this in position when the awning door is not rolled up and secured by the toggles which could otherwise help support this pole).
Packing up tips
Packing up is essentially the reverse of setting up (zip up all the window and door inner fabrics first), HOWEVER, you will need to ensure it is dry before storage and this is probably best done when you get home. I like to take the inner frame part home wrapped up in a tarp, and have the fly separate.
To dry out the floor, lay the inner out on dry paving or concrete then dry out a third of the floor at a time – initially fold in one leg from each hub for the first third. When that is dry, fold in the other two legs and they will probably stay near vertical. When that is dry you have to try to dry out the middle part without getting it all tangled up.
Make sure you don’t dry it out where your cat can claw a hole in the floor like mine did for me!
Once it is dry, lay it out on the dry ground just as you would when about to set it up, with the hubs on top and each folded leg spread out. Then sequentially do the final fold of each leg towards the connecting beam between the hubs and as you do fold in any excess floor. Then you should be able to use the two supplied straps to bind it nicely for storage.
The fly may need to be spread out over an outdoor setting or similar to dry out. Once dry it can be stuffed back into the bag for storage.
Differences compared to the Oztrail 4P Fast Frame Blockout Tent
Much of this tent is identical to the 4P version, but it has a number of differences to note:
- larger floor size of the inner tent, now 300x280cm instead of 240x220cm and this gives you a LOT more room, indeed if like me you like to use a 2P freestanding dome inside the inner tent, unlike the 4P version, there is now plenty of room to walk around the 2P tent to get to the opposite door.
- DUAL HUB fast frame instead of single hub frame – does make it a touch more complicated but once you get the hang of it, it works well.
- much wider ceiling mesh for viewing the night sky when fly not in use
- wider rear awning so they have added a rear Duraplus vestibule pole for added headroom which inserts into eyelets on each side of the inner then bows out to push the fly upwards and outwards – unfortunately they did not add a method to hold it in position so it slips out in any wind – a solution may be to clamp it in place from a clamp on the outside
- each corner of the inner now has an internal tensioning strap (see issues below)
- wider vestibule and rear awning area – now 3m wide
- 3kg heavier now at 18kg instead of 15kg for the 4P
Main features I liked
Inner canopy with the fast frame design:
- does indeed set up very fast within 2 minutes and folds down just as fast
- has a large front AND rear door for versatility
- as with the 4P, it gives you height for getting changed in clothing more comfortably as well as extra weather protection and amenity which you don’t get with a 2P or 3P dome tent.
- has two very large mesh windows – one on each side
- has two vent windows – one on each side which could be very useful on hot nights or during the day
- the doors, windows and the low vents all have zip up inner fabric for total privacy or reduced wind chill
- even with window and door fabric layer fully unzipped leaving only mesh for maximum ventilation on warm nights, you still get a LOT of privacy – people need to walk within 1-2m to see you sleeping on the floor!
- the mesh is No-See-Um to stop even the midges getting in and being black affords a degree of privacy if the inside is dark
- the ceiling has 4 large mesh windows so you can see the stars if you don’t use the fly
- there are two hooks for a suspended ceiling light and the height of the ceiling is a generous 195cm
- there are two power cord points – one at each end
- the 300x280cm PolyOxford floor seems to be sufficiently durable with careful use and is appears to be adequately waterproof – my tests of the same flooring in the 4P tested in a 25mm overnight rain event which resulted in some water pooling under the tent but no water made it inside the tent from the floor – very impressed! This floor is far better than the crinkly, noisy, cheap polyethylene floors of the more budget models!
Fly with the blockout material:
- Blockout seems to work great and does indeed provide for a better experience during the day time in summer .
- the Blockout makes the inside nice and dark during the day and if there is no direct sunlight coming in, this adds a lot of privacy even if your door is fully open
- NOTE: the Blockout will NOT lower the temperature below ambient temperatures in the shade – it only reduces how much the tent temperature will rise above ambient shade temperatures when in full sun. In my tests at 34degC in full afternoon summer sun in Australia, whilst the fly itself felt very hot – perhaps around 50degC, the air temperature near the floor was around 38degC with only one door and one window open for ventilation and minimal breeze. I am presuming without the Blockout layer this floor level temperature would have been much hotter. Had there been a breeze it would have been more comfortable but still hot at the ambient temperature as a minimum.
- material seems adequate
- when properly set up with full guy ropes and pegging, it stabilises the tent extremely well even in strong wind gusts, I have used the 4P version on many nights at The Prom with 60kph gusts all night and no damage (but used strong sand pegs and good guy ropes) and this should perform just as well given my tests of the inner tent alone with 4 guy ropes in similar winds.
- has a reasonably large front vestibule, large enough for a small chair and small table, and the door can be unzipped and turned into an awning with the supplied poles. The bottom of the vestibule reaches out 120cm from the door whilst the top zip opening of the vestibule reaches out 65cm from the door to provide a reasonable rain protection overhang.
- rear door can also be turned into an awning – on the 4P I often add a tarp as a side wall for added wind protection.
- window covers can rolled up or can be guyed out to provide rain protection whilst allowing ventilation and also have a mesh layer for further privacy and reduction in wind chill
- fly is rated at 3000mm waterhead which is sufficient – and in my testing of the 4P it worked extremely well in a 25mm rain event overnight with drops of water coming from the rear awning seam. This is much better than the 1500mm rated flys of the cheaper lighter models!
Aspects I did not like or could be improved:
Inner canopy with the fast frame design:
- like the 4P, is very unstable in strong winds if the fly is not used and is liable to collapse and be damaged, but at least it can be used alone if no winds or rain is forecast and you want a rapid set up to view the stars or to easily move sites. Inner tent needs to have guy out points so it can be used without the fly in stronger winds – I suspect the next version in 2023 will have this as Oztrail have added this to their new 3P Fast Frame tent. However, as mentioned above, in desperation I did secure the inner tent from strong winds successfully using 4 guy ropes, each attached just above the frame leg elbos.
- like the 4P, it is more difficult to set up with one person in strong winds as it really needs the fly with guy ropes in place to stabilise it in these conditions
- like the 4P, there are only 2 corner pockets which are often too far away to reach from your stretcher bed
- like the 4P, the door and window inner fabric does not zip down low which makes it impossible to watch the local wildlife on the ground outside your tent
- like the 4P, the ceiling mesh is vulnerable to damage when packing/unpacking due to the ends of the folding legs.
- like the 4P, unlike a dome tent, it is impossible to roll it over on its side to dry out the under-floor before packing up as it will just collapse – you will probably need to pack it wet and dry it when you get home before storage – an option may be to hang it upside down fully assembled or just have it suspended to help it dry the floor out
- New design issues not present on the 4P version as a result of it being a significantly wider tent:
- each corner now has a tensioning strap inside which passes outside at the bottom to attach to the frame which leaves a 0.5x1cm gap at the bottom of each corner which could allow insects to come in. On one of my trips, dozens of ants found their way through one such hole as I had an afternoon nap which did not impress me at all!
- My version did not seem as watertight as my 4P (although the inner is not meant to be watertight), with water leaking through the zips at the bottom of the doors and the floor level air vents.
Fly with the blockout material:
These are generally the same issues as the 4P tent:
- as with all such tents, the fly takes about 20-30minutes to set up – pegging, multiple velcro attachments to the canopy frame which are important, and guy ropes if it is windy – unlike a dome tent, you really don’t want to be moving it to a different site in strong winds by yourself – choose a sheltered site in the first place if strong winds are forecast!
- hard to throw the fly over the tent if you are a short solo camper without a helper – you may need to lower the frame to do so – tip: clip in two of the fly buckles on the wind side first before throwing it over.
- harder to set up in a strong wind with only one person and does possibly risk the frame getting damaged which would make the tent useless
- supplied guy ropes are not adequate to stabilise the tent in strong winds resulting in possible frame damage as above (this is especially the case with the larger dual hub 6P version) – buy some heavy duty ones!
- supplied pegs are inadequate – get some decent ones – if you are carrying that weight, the extra weight of better pegs is not an issue!
- the toggles that are used to hold the windows rolled up are poorly designed and easily rip out
- the eyelets on the awnings are too small to allow OzTrails adjustable tent poles to fit (but at least there are elastic rings you can use instead) – I prefer adjustable poles to the supplied poles as in rain events the awning can be lowered to reduce water pooling on it.
- the Blockout layer does start to rub off over friction areas over time.
- a new design issue arises from the extra width of the fly resulting in the rear awning section sagging. Their solution was to add a rear Duraplus vestibule pole for added headroom which inserts into eyelets on each side of the inner then bows out to push the fly upwards and outwards – this needs to be inserted into the difficult to see black tubular part of the fly.
Quality control:
Admittedly you do get a lot of tent for the money, however, there are a number of issues I have already encountered with this tent but I still love it for the price:
- when unpacking the first time, a clip had been placed in the wrong position which caused frustration and confusion in trying to undo the legs ready for set up. Perhaps this is a packing design but given the relative absence of good set up instructions it was not helpful.
- I presume as with the 4P, the window toggles break very easily if you pull too hard
- peg quality is just OK – buy better pegs!
- guy rope system keeps coming lose in winds – buy better guy ropes!
- as with the 4P, the carry bag could have been bigger – it is a tight fit – I decided to store the fly separately for transport home – when packing up in the rain, I either put the tent and fly separately into the pod on my car roof, or wrap the inner tent in a tarp and pack the fly in its bag. I would prefer they supplied it with a 2nd fly bag so each component would be a bit lighter to lift.
For extra warmth it even fits a 2P dome tent!
A freestanding 2P dome tent without its fly such as the MacPac Apollo will easily fit inside this tent and this can give you the best of both worlds in cold weather as it is much easier to warm up a 2P tent than a 6P tent.
A 2P full fabric dome tent allows a smaller air space to allow your body and any additional heaters such as 12V electric heating mats to heat up the air that you breathe. This can be a very useful technique if you suffer from asthma or cold-induced coughing. It can also provide an extra measure to combat mosquitoes. Your stretcher bed will also just fit inside the 2P dome tent as well which brings your face closer to the warmer air at the top of the 2P tent. You could also get more cold protection by covering the dome tent with insulating materials without worrying about the weather compromising them as the 6P tent will protect it.
My favourite is to use an Oztrail 2P Mozzie Tent inside which works well and means you can leave the main tent doors unzipped so you are not continually zipping and unzipping when walking around. It is easier to control mosquitoes inside a 2P tent than inside a 6P tent. It also addresses the potential design issues with the corner gaps potentially letting in insects, and when using the 6P tent without a fly, the Mozzie tent bucket floor provides extra waterproofing if it does rain and zipping the windows and doors up and adding a 4x4m tarp in top does not suffice to prevent all water ingress.
Warm summer nights without the fly
This tent is awesome on warm summer nights as you can use it without the fly so you can see the stars through the wide ceiling mesh windows and you still have good privacy and breeze control options.
If it is windy, you should attach guy ropes to each of the pole elbow regions.
If it suddenly starts raining you can rapidly apply a hiking tarp over the top (3.6×2.4m would suffice but a 4x4m would allow better window shelter if you plan to guy the tarp out for visibility and ventilation).
In testing, unlike my Oztrail 4P inner tent, my 6P inner tent was not waterproof even with a tarp clamped and all windows and doors closed up with the inner fabric layer zipped up – water did enter at the bottom of the doors and at the floor vent zippers – hence guying out a 4x4m tarp is a much better option than just clamping a tarp to the frame and provides the advantage you can keep the windows and doors as only mesh for visibility and ventilation.
Conclusion:
As with the 4P tent, I do really like this tent and for me the extra space is worth the increased weight, size and complexity so I can more comfortably use my 2P tents inside.
It is a great tent for ONE to TWO people and is perhaps the goldilocks size for car camping without kids.
I love it for warm summer nights with no rain and minimal breezes – works well without the fly in these conditions and really does become a rapid set up and take down option with excellent flexibility in terms of privacy vs ventilation vs wind chill protection while still being able to see the stars through the ceiling mesh – and the rear door is a real benefit!
It is also great with the fly on for summer camping and the blockout and ventilation makes it a viable option for sleeping in during the daylight hours (if ambient temperatures are not too warm) and you won’t be woken by the early sunrise – but I would be very careful in site selection and use of good guy ropes and pegs if the forecast is for wind gusts over 50kph.
The RRP is $AU729 but can be found on special for around $AU329 making it a great value option – if you have space for it in your car!
The Australian distributor is Oztrail.
A comparable tent with similar features is the Coleman Instant Up 6P Gold Series Evo Tent – 6 Person but it has a smaller vestibule (and no vestibule arch poles) and no ceiling mesh nor blockout, and no rear door.
The Coleman Northstar Instant Up 6 Lighted DarkRoom Tent is closer to the specs of the OzTrail 6P Blockout tent as it does have the blockout and the larger vestibule but still no ceiling mesh although you do get LED lights and it is considerably more expensive.
The new BlackWolf Turbo BLK Lite 300 Tent is a slightly larger and taller blockout tent measuring 300x300x210cm high and having a more heavy duty and more durable pop-up style single hub aluminium frame which you push up from underneath, but it is 25.5kg with a much longer packed size of 140cm length, does not have a rear door or window and is far more expensive at $AU1599.
See also my photography and camping wikipedia – more Touring Tents.


