The Olympus E-M5 wanders through the Roman city of Bath in England

Written by Gary on July 21st, 2012

My 1st adventures roaming south-west England in my hire car took me by necessity to the wonderful little city of Bath in Somerset – one of the “must see” tourist destinations in England, and I must say, I did enjoy walking its streets.

Here are a few of my iPad processed shots taken with the Olympus E-M5 Micro Four Thirds camera.

Here I pushed the E-M5 to its hand held long exposure limits again to capture the flowing water of the River Avon at dusk at the 18th century Pulteney Bridge – 1/3rd second exposure with the Olympus 12mm lens:


long exposure hand held

a night time hand held shot in the rain with the 12mm lens:

night street shot hand held

an outdoor public wooden sculpture by Sophie Dickens depicting judo wrestling “Morote seoi nage” to celebrate sport and 2012:

sculpture

a happy couple in the evening light:

lovers

Shepherd’s Hall in one of the back streets:

Shepherd's Hall

in celebration of the healing powers of water at the early 16th century Bath Abbey – some nice bokeh using the Olympus 45mm f/1.8 lens:

holy water

and you can’t visit Bath without visiting the reconstruction of the Roman Baths:

Roman Baths

While in Bath, there is much to see, including the Holburne Museum of Art which displays some very nice historical artefacts and paintings such as this one taken with the Olympus 45mm lens (without a flash of course!) by Pieter Brueghel the Younger (1565-1638) depicting a busy farmhouse kitchen at the “Visit by the Godfather” (this is essentially straight from camera with the picture frame cropped, contrast increased a touch, and resized for web – custom white balance taken prior to shot):

Farmhouse kitchen

I managed to find some very nice coffee at a cafe called Same Same But Different, and breakfast at Pulteny Bridge on a “Summer” morning was lovely at the Riverside Cafe.

All the above were taken with the amazing Olympus E-M5 Micro Four Thirds camera, more pics on my Flickr set


A first trip to England would not be complete without a drive through the Cotswolds and a walk through Oxford – the Olympus E-M5 shines again

Written by Gary on July 16th, 2012

For an Australian, driving in England is not so bad given we drive on the same side of the road – the only thing that really stressed me out was the ridiculously frequent speed camera warnings on the Tom Tom GPS and worrying if the rental car company was going to send me a massive bill for the speeding fines – fortunately, I seem to have managed to drive 1000km (for those still in the land of dinosaurs – that be about 600 miles) whilst ensuring I was under the speed limit – not so easy for the uninitiated when the speed limit is a circle with a stripe through it and which seems to vary between 60mph and 70mph while the locals do 80mph.

It is even more weird that the roads, once off the motorways, have a 60mph speed limit yet are narrow two way affairs on winding, hilly roads with massive hedges each side making one claustrophobic and preventing any chance of stopping to check any views – at least I presume there may have been some nice views behind the hedges.

Nevertheless, they have done some things well like trying to keep cars out of the busy centers such as Oxford.

Apart from the quaint, lovely medieval villages and lovely English country gardens, the Summer rural countryside reminded me of home … yes central Victoria and Gippsland in Australia … in Winter … well perhaps Spring … when the fields are still green…

If Australia did have a medieval past, none of it would remain anywhere given the propensity for regular bushfires each century to destroy everything in their path and pave the way for nature to renew itself … a bit like nature cleansing itself of the presence of man ….

But I digress … back to the medieval villages, many of which are now detracted by the tourism, but to the new tourists, still quaint and pretty.

Bibury:

Bibury

Minster Lovell Hall – ruins of a 14th century country manor:

Minster Lovell Hall

Bourton-on-water … the only time I bothered to get my little 30cm tripod out on my whole trip … and this was to try taking a 10sec exposure of the flowing stream using a 10 stop ND filter on the Olympus 12mm lens and post-processed on the iPad whilst I was travelling:

Minster Lovell Hall

Castle Combe village:
Castle Combe village

Castle Combe village:
Castle Combe village

Oxford is a wonderful little city which I enjoyed immensely, even in the rain, and makes a nice base from which to explore the Cotswolds – I stayed in a lovely hotel near the Ring Road to make access easier, and caught a bus into Oxford as car parking is apparently problematic.

Oxford university exam day when the students must wear suits with flowers to attend the exams:

Oxford exam day

Oxford

The tree used in the Harry Potter movie – New Oxford uni campus:

Harry Potter's tree

As usual, all the above were taken with the amazing Olympus E-M5 Micro Four Thirds camera, more pics on my Flickr set


The amazing British Museum, London

Written by Gary on July 16th, 2012

Those visiting London for the Olympic Games in the apparently atypical very wet “Summer”, should make sure they take the time to visit the wonderful British Museum – it’s free entry, out of the wind and rain, and unlike the London art galleries, you can use your camera – all the better if you can use a wide aperture prime lens with image stabilisation as I did by using the brilliant new Olympus E-M5 Micro Four Thirds camera with the Olympus 45mm f/1.8 portrait lens which allows even the darkest areas inside glass enclosures to be photographed without using a flash.

Be aware though that the E-M5 has so much dynamic range that you will probably want to shoot RAW and increase contrast in post-processing as I have done to most of these.

You may wish to set custom white balance in the camera in the variable museum light sources as most subjects do not have a neutral colour to use later on, but if shooting RAW, you can adjust WB to your heart’s content which I did for some of these just for fun.

The British Museum (the only photo in this post taken with the Olympus 12mm f/2.0 lens):


British Museum

Lion hunting, Assyrian Empire c700BC:

Lion hunting

Amazon woman fighting a Greek man:

Amazon woman fighting

Parthenon statues – Hestia with Aphrodite lying in her mother’s lap (Dione):

Parthenon statues

Bust of Zeus in the library, from Roman Emperor Hadrian in Tripoli:

Zeus

Skeleton in an Egyptian coffin c3000 BC – placing a body in a coffin resulted in decay and loss of soft tissues as the body was no longer in contact with the drying effects of the sand, this practice apparently started around 3,000 BC:

Egyptian coffin

There is also a nice selection of etchings by Pablo Picasso such as this one of 4 nude women with a sculpture made in 1934:

Piccaso

And a very difficult to photograph large Epifania Cartoon made by Michelangelo in 1550-1555 using black chalk:

Michelangelo

There is so much more to see at the museum, it was a fascinating day well spent – don’t forget to take a break and get some lunch at one of the many cafe’s in the adjacent district – I found a lovely French one where the waitress actually made some proper coffee – almost unheard of in England!


More of London – walking the streets with the Olympus E-M5

Written by Gary on July 10th, 2012

A few more shots as I explored the streets of London.
A side lane in Kensington, and inner suburb:

Kensington

Here is an indoor shot of a Nando’s restaurant in a renovated wharf storehouse shot hand held without a flash using the brilliant combination of the Olympus E-M5 with the Olympus 12mm f/2.0 lens:

Nando's

Tower Bridge:

Tower Bridge

The Gherkin:

Gherkin

War memorial honoring the many British women involved in the war:

War memorial

No trip to London would be complete without a shot of their red telephone boxes:

Telephone box

A book shop with some interesting titles:

Book shop

Stalagmites of Westminster:

Westminster

And finally, for this post, an example of their Jubilee celebrations with even the taxi’s getting a coat of paint:

Jubilee

I will be adding more posts over the next 2 weeks, but for those who wish to cheat, they can check out some photos that I have already uploaded to my Flickr set.


Walking the streets of London with my Olympus E-M5

Written by Gary on July 8th, 2012

Having arrived in London a few days after the Queen’s Jubilee celebrations finished, many areas such as Buckingham Palace were off-limits due to workman removing the stages.

Nevertheless, I thought it was my duty as an Australian and descendant of a convict – or two, to document a few iconic images of London despite the overcast conditions and lack on nice sunrises to give the classic Golden Hour (not that London’s public transport starts early enough for you to take a train into London before the 4.30am or so sunrise!).

First up we have the fabulous Westminster Parliament Houses and of course, Big Ben – here I used a Cokin tobacco gradient filter on my Panasonic 14-140mm lens to make it a bit more interesting given the otherwise boring gray skies, and it was cropped in a iPad app and uploaded to the net, although this version has been further down-sized in Lightroom:

Westminster

And, the once cute black cabs, which have now been taken over by consumerism (sadly Picadilly Circus is now starting to look a bit like New York’s Time Square with it’s super-sized flashing advertising signs – but I guess that is the sign of the times and money trumps aesthetics and culture):

black cab

and another waiting at traffic lights at the Black Friar’s pub:

Black Friar's

It seems the London youth are fed up with the inequities and injustices created by globalisation exacerbated by the economic adversities resulting from the GFC, although, perhaps unfairly, they are here targeting the Royal family, although a bit of graffiti is nicer than burning down the house:

graffiti


Not even a lousy British “Summer” can get in the way of the Olympus E-M5 camera – thank goodness it is weatherproof!

Written by Gary on July 7th, 2012

I have just returned from 4 weeks in England and Ireland – destinations which have always been high on my list of priorities given that my ancestors decided to or were made to leave there well over 150 years ago to come to sunny, warm Australia – and I guess not un-surprisingly, not a single descendant that I am aware of has wanted to emigrate back there.

To be fair on England, this was apparently their wettest, coldest, cloudiest June in living memory – but I am still not used to wearing a scarf and trenchcoat with umbrella in tow almost every day of a Summer month – although I do remember this happening in Sydney in January just a few years ago – although it was warmer and wetter!

One of the first things I did on arrival was to throw out my good leather shoes and buy some waterproof boots as wet socks are not conducive to a pleasure stroll through the streets of London.

I had done much photographic research on south-west England and had packed a number of reverse graduated and normal neutral gradient filters to assist with my sunrise and sunset shots, particularly along the coasts – I never used them once – mainly because I never actually saw a nice sunrise or sunset because of the perpetual clouds on the horizon which totally blocked the sun’s rays let alone the sun – the golden hour is a rare commodity it would seem!

I had even awoken at 4am every morning just in case there was a golden hour – as sunrise in such northern latitudes occurs at such an ungodly hour, while sunset was closer to 10pm – the rest of the day was generally just the same gray, overcast skies with the occasional day when the sun would peep through between showers.

At least we managed to avoid the many regions with major flooding whilst we were there, and given our recent experiences with major flooding, I could emphasise with the poor people caught in them.

I was tempted to do some storm chasing, but I suspect my hire care insurance would not have fully covered such activities, and certainly my wife would never have allowed it!

Our first 5 nights was spent in a lovely apartment in the inner neighbourhoods of London, and we managed to find a fantastic local pub away from the touristic areas for our evening meals which were the perfect way to warm us up again after all day walking around London.

I was really impressed with the subway train system – although there were the odd line closures and the odd delayed train, we rarely had to wait more than 5 minutes for a train, and travelling off-peak, there was plenty of room on the trains, although the connecting subways were often extremely crowded even then – I am  not sure how they will cope with the Olympics.

The Oyster card seemed to work much more responsively and reliably than our troubled but very similar Myki card in Melbourne.

Walking the streets of London was generally very pleasant and safe, as long as you were dressed and prepared for the rain and wind-chill – unfortunately very few areas have verandah protection, and the wind can quickly compromise your umbrella, while the uneven paths and roads quickly fill with puddles which can be difficult to avoid – I now understand why Wellington gum boots are a fashion item for women in the UK – they have never really made it big in Australia!

Despite all the negative sentiments outlined above, we had a great time exploring London for the first time – the architecture is fantastic and it’s history and culture always interesting.

Now let’s get back to some photography – as outlined in my previous post, I did manage to pack quite a lot of gear in such a small bag to bring with me for this trip – but in the end I only used 3 lenses (the Panasonic 14-140mm for general day time strolling around, the Olympus mZD 45mm f/1.8 for when I needed shallower DOF or low light capabilities, and the Olympus mZD 12mm f/2.0 for indoors and night time low light work as one can do hand held shots down to half second exposures using this lens!), the fantastic, weatherproof Olympus OM-D E-M5 Micro Four Thirds camera, a polarising filter to bring out the foliage, a graduated ND filter to bring out the stormy skies (although rarely used in London itself).

In the whole 4 weeks, I used my compact 30cm tripod only once and that was for some 10 second exposures of a stream in the Cotswolds – the rest of the time, the 12mm lens with the image stabilisation of the E-M5 addressed my flowing water and low light needs.

Next time I will be leaving at home my ZD 50-200mm lens, the Sigma 19mm lens, the Rokinon 85mm f/1.4 lens and my lovely but big and heavy, Panasonic 25mm f/1.4 Four Thirds lens.

If anything, I will add the Olympus mZD 75mm f/1.8 if I can convince my wife to let me buy it!

As I was not taking indoor portraits of friends, I never used a flash during the whole 4 week trip, so my FL36R flash will be staying at home too!

Here is a typical day in London in June 2012 – this one was taken in Trafalgar Square using the Olympus 45mm f/1.8 portrait lens, essentially straight from camera other than resizing for web and a touch of vignette:

portrait

One of the best things to do in London on a rainy day is explore the fantastic British Museum as it has one of the best collections of cultural artefacts in the world – my apologies in advance as many of my photos in England were post-processed with very limited options on the next to useless iPad (although it is great for checking emails, backing up your photos and uploading them to Facebook or Flickr – but you can’t drag and drop so the Flickr organiser cannot be used on an iPad and the Flickr apps are severely compromised) – some may like the processing, some won’t:

Olympus 12mm f/2.0 lens:

British Museum

While the art galleries were not the same calibre as those in Paris or New York, they were nevertheless very well worth checking out on a rainy day and were free, but generally photography was banned unlike most other major galleries – here is a view of St Paul’s cathedral and the Millenium Bridge from the Tate Modern gallery:

Panasonic 14-140mm lens with ND gradient filter and a PhotoToaster iPad app effect:

St Paul's

I will be adding more posts over the next 2 weeks, but for those who wish to cheat, they can check out some photos that I have already uploaded to my Flickr set.


My photo travel kit for 4 weeks in UK and Ireland – Olympus E-M5 and awesome lenses all under 4.5kg including iPad and other goodies

Written by Gary on June 7th, 2012

Have just finished packing my bags for my 4 week trip to UK and Ireland.

I chose Micro Four Thirds when it first came out because I realised it would be THE camera kit for international travel with its limited airline carry-on luggage weight and size limits.

The awesome Olympus OM-D E-M5 camera is small, light, weatherproof and gives high image quality, shallow DOF when I need it with lovely bokeh from the lenses which are image stabilised meaning I really will not need a big tripod even at night without a flash.

So what did I bring to fit into a normal hiker’s backpack and have it all weigh in at only 4.5kg?

travel kit

and with the E-M5, 12mm f/2.0, 14-42mm kit lens, 45mm f/1.8, clip on flash and spare battery all fitting easily in a LowePro TopLoad Zoom 1 bag for added protection:

travel kit with bag

The 4.5kg consists of:

  • cheap hiker’s day backpack
  • Apple iPad (to back up my photos)
  • Apple iPhone
  • Olympus OM-D E-M5 camera
  • Olympus mZD 12mm f/2.0 lens
  • Olympus mZD 14-42mm II lens
  • Olympus mZD 45mm f/1.8 lens
  • Panasonic Leica-D Four Thirds 25mm f/1.4 lens with MMF-2 adapter
  • Olympus ZD Four Thirds 50-200mm f/2.8-3.5 SWD lens with weatherproof MMF-3 adapter and lens case
  • Panasonic Lumix 14-140mm HD lens (old habits die hard – I find this nice for walkaround travel shots during daytime when I can’t be bothered changing prime lenses)
  • spare SD cards
  • spare battery
  • LowePro TopLoader Zoom1 camera bag
  • travel docs and miscellaneous items

In addition, I put some cheaper items in checked in luggage which with my Aussie winter clothes and boots for the UK summer came to under 16kg:

  • compact travel tripod (in case I need to do shots longer than half a second)
  • Olympus FL-36R flash (in case I do indoor portraits and available light is not nice)
  • Rokinon 85mm f/1.4 manual focus lens with Canon EOS to MFT adapter (well I just couldn’t leave this one at home!)
  • Sigma 19mm f/2.8 Micro Four Thirds lens
  • ND gradient filters, other filters, battery chargers, iPad SD card adapter, power board, etc.

The ONLY other lens which I considered bringing is my lovely Olympus ZD Four Thirds 7-14mm ultra wide angle zoom lens but I would be start to push through the 5kg back pack weight, it was too expensive to put in checked in baggage, and thus I decided this time, I would leave it at home.

I thus have 24mm to 400mm focal length range fully covered with high quality image stabilised lenses (thanks to the E-M5), lovely wide aperture low light lenses and some nice bokeh lenses.

That should be plenty enough to give me fun even in dreary, rainy, dark UK weather.

ps.. apologies for the lousy DOF in these photos, I used my Canon 1D Mark III in low light indoors and had to resort for a wide aperture as I didn’t have time to get the flash out.

Note that I may not get to post much in the next 4 weeks as the iPad, and as I understand it, rather shaky mobile ineternet in rural UK and Ireland may make posting blogs difficult, plus I will be having too much fun with my E-M5 to actually bother using the internet.


Olympus OM-D E-M5 Micro Four Thirds camera takes a portrait of the lady of the night – the Transit of Venus

Written by Gary on June 7th, 2012

The transit of venus across the sun is quite a rare astronomical event happening on paired events each century or so.

I captured the 1st of this paired event in June 2004 whilst I was in Cairns in northern Queensland, Australia using the only digital camera I had at that time – a hand held Olympus C8080WZ 8 megapixel prosumer camera with a teleconverter attached and an astronomical solar filter – here is a collage I made at the time:


2004 transit collage

Today I decided to get a quick shot in before I had to race off to work just minutes before this event finished and none of us will see such an event again.

This time, I had the luxury of using the awesome Olympus OM-D E-M5 Micro Four Thirds camera combined with my Zuiko Digital EC-20 2x teleconverter and ZD 50-200mm f/2.8-3.5 SWD lens, and the same solar filter hanging on the end of the lens (it is way too big for this lens!)

At a 35mm effective focal length of 800mm and resorting to manual focus, a sturdy tripod with self-timer was critical to success.

The exposure I chose hopefully optimised image quality by using ISO 200, f/11 and 1/160th sec through the clouds which dominated today in Melbourne.

The image shown below is a cropped, and resized version for quick web display, you can click on it to view the original, unprocessed (except for default Lightroom export sharpening) image which has been cropped to give a nicer aspect.

The big circle is the sun with clouds in front of it, while the black dot is Venus just about to finish her transit across the face of the sun. You can also see a number of sunspots – better viewed on the large version by clicking on this image.

2012 transit


Olympus OM-D E-M5 vs full frame dSLR 30″x40″ print quality – not easy to pick the difference!!!

Written by Gary on June 3rd, 2012

Last weekend I attended the Digital Show in Melbourne where Olympus had a very prominent stand showing off their fantastic new Olympus OM-D E-M5 Micro Four Thirds camera.

To prove a point they invited pro photographers along to shoot a model in studio conditions with their full frame dSLR and processed these RAW shots and printed to 30″ x 40″ prints.

These prints were compared with 30″ x 40″ prints shot at the same time from the E-M5 out of camera jpegs using the 12-50mm lens.

I must say, I really hard a very hard time telling which was the full frame dSLR shots, the prints were that close in quality!

And this is comparing prints from RAW files shot with Canon 5D Mark II and Nikon D700 with pro lenses to the E-M5 with a consumer kit lens!

Of course, these conditions were not showing off the main advantage of full frame dSLRs over the E-M5 such as ultra shallow depth of field but it was a very surprising comparison nevertheless!

I just wish I took a few shots of the side-by-side print comparisons!

See a quick video on the contest hosted at cnet.com.


Shallow depth of field in photography – a double edged sword

Written by Gary on June 1st, 2012

Back in the old film days, many photographers were plagued by the problem of not getting enough depth of field for the light on their subject and the slow film speeds of the day and no image stabilisation to allow longer shutter speeds.

Depth of field issues is one of the reasons expensive tilt-shift lenses were designed so that landscape photographers even with their cameras mounted on tripods so they could use f/16 apertures could get their whole image acceptably sharp and detailed from foreground to background.

An out of focus foreground or background in a documentary landscape can be extremely annoying for the viewer.

On the other hand if your subject is not the scenery but a discrete subject, then shallow depth of field can be used brilliantly to separate your subject from the otherwise distracting background and make them “pop” – a favorite technique of the romanticists out there.

The excitement over the great image quality and versatility of the awesome new Olympus OM-D E-M5 Micro Four Thirds camera has yet again ignited debate that as great as it is, it can’t ever achieve the shallow DOF of a full frame dSLR even though for many other purposes most people would not be able to tell the difference between a 30″ x 40″ print from either camera.

I decided to post this blog based on some recent experiences which demonstrate the double edged sword of shallow DOF – as much as I love it as a tool, it can easily work against you.

First, let’s address the technical issue of DOF.

A full frame dSLR sensor size will always give you more control over depth of field than a smaller sensor camera
in that one can choose to go deep DOF by closing aperture down further than a small sensor camera before diffraction limitations start destroying your image resolution, and one can usually go shallower DOF by choosing a wider aperture lens for a given field of view.

The advantages of full frame dSLR for shallow DOF are particularly the case for subjects taken at a distance of more than 1-2m with a wide to standard field of view lens.

For macrophotography, close up photography and telephoto photography, Micro Four Thirds will generally be able to deliver you as shallow a DOF as you need as long as you have a reasonable aperture lens.

To get the same DOF and field of view on a Micro Four Thirds camera as a full frame dSLR you need to use a lens of focal length AND aperture half that used on a full frame dSLR.

So a 24mm f/1.4 lens of a full frame camera would require a 12mm f/0.7 lens on Micro Four Thirds and that is not going to happen any time soon although there is a 17mm f/0.95 lens.

Likewise a 50mm f/1.2 lens on a full frame would require a 25mm f/0.6 and the closest we will get is a f/0.95, while most of us will settle for the lovely Panasonic 25mm f/1.4.

The Canon 85mm f/1.2 lens on a full frame would require a 43mm f/0.6 lens and again, the closest we can expect is a f/0.95 lens around that field of view range.

The 135mm f/2.0 lens on a full frame lens would require a 67mm f/1.0 lens to match it.

The 200mm f/2.8 lens on a full frame would require a 100mm f/1.4 lens and the closest we will have is the 85mm f/1.2, 85mm f/1.4, or if you need AF, the 75mm f/1.8.

So you get the picture if you place a super expensive wide aperture lens on a full frame dSLR you will nearly always be able to get more DOF control than when using a cropped sensor camera – that’s just the way it is.

BUT, this capability has it’s downsides.

1. you now have to think about your subject very carefully and decide how much DOF you need to capture it well, and thus exactly which aperture for the given lens and subject distance.

2. if you are forced to use wide aperture such as hand held shots at night, or wide aperture sports shots at fast shutter speeds, you may be plagued with the age old problem of not enough DOF and most viewers hate a blurry subject!

Let me demonstrate each of these from my own recent experience.

1st a couple of potentially stuffed up shots.

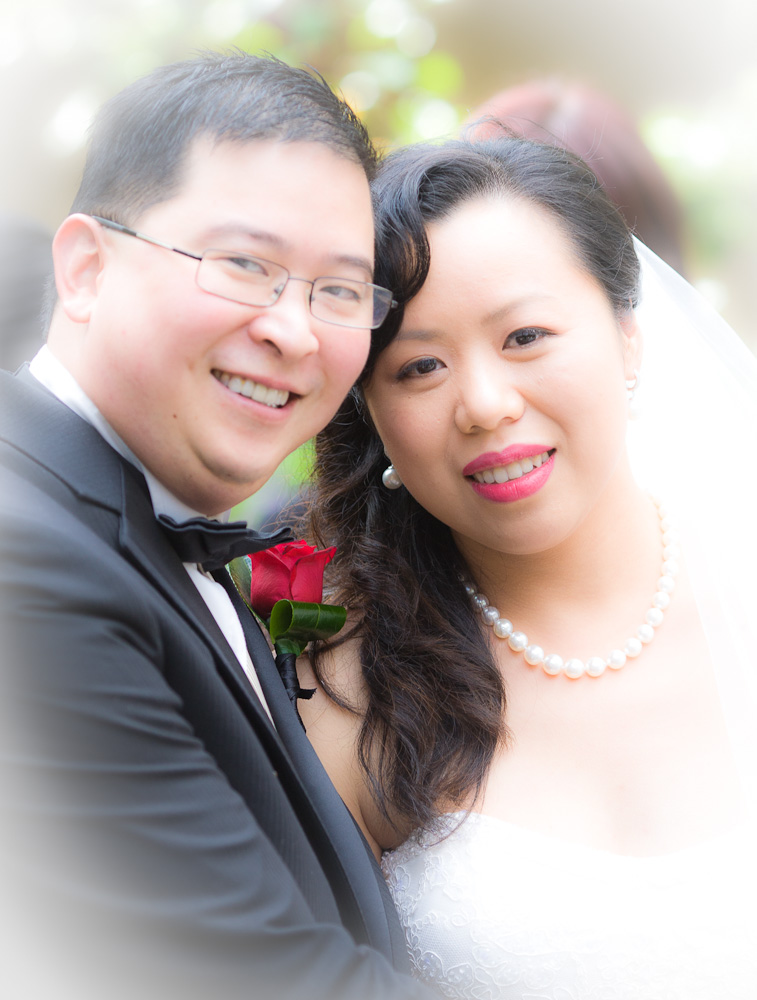
A wedding shot with a pro dSLR (almost full frame Canon 1D Mark III 1.3x crop sensor) combined with my favorite lens for this camera, the 135mm f/2.0 L lens.

Now as I have mentioned before, using the amazingly cheap Rokinon/Samyang 85mm f/1.4 on a Micro Four Thirds camera yields almost identical imagery (field of view, DOF and bokeh) as this combination at a quarter the weight, size and price, but that is another story – see here for related posts of this lens:

I generally shoot half body shots with this lens at f/2.5-f/2.8 to get sufficient DOF for my subject, so for this couple shot, I lazily just closed the aperture down a bit more to f/3.2 to give me a touch more DOF without making the background too distracting.

Unfortunately, I failed to chimp the image after the shot was taken to carefully check my DOF (it didn’t help that the Canon did not have an EVF to do this and my reading glasses were left in the car!).

Needless to say, the bride looks beautiful and sharp, but the groom is well out of focus, and I had to salvage it a bit by turning it into a romantic looking shot – luckily I was not the official photographer!


Canon example

Ah, yes, what a crappy photographer I can be sometimes! But surely I can’t get too shallow a DOF using the new Olympus OM-D E-M5 camera with its cropped sensor…

oh yes I can…..this is the 1st shot I took using the Olympus mZD 45mm f/1.8 lens playing around with the fun touch the screen on the subject and almost instant AF and shutter release:


E-M5 example

OK, it is a lovely candid shot of my mischievous kitten but closer inspection will reveal that her eyes are incredibly sharp even with this lens at f/1.8, but her nose is well out of focus – a big mistake in portrait photography – always aim to get tip of nose to ear in focus unless you are aiming for special effects like with my tilt-shift lens where one can change the plane of focus such as in the glamour portrait below:


tilt-shift example

 In summary, a cropped sensor camera will not replace the capability of ultra shallow DOF of a full frame dSLR, but a camera such as the Olympus E-M5 when teamed up with wide aperture lenses opens up new avenues for hand held low light photography whilst still maintaining an adequate DOF for your subject.

For most of us the Micro Four Thirds system when teamed with its lovely wide aperture lenses such as the 12mm f/2.0, 25mm f/1.4, 45mm f/1.8 and 75mm f/1.8 will address our shallow DOF as much as we need and for those who want to explore more shallow DOF, then they can enjoy the manual focus f/0.95 lenses, or even use the Canon 85mm f/1.2 and have them all image stabilised.