New Nikon D5000 entry level dSLR with flip out LCD and video functionality

Written by Gary on April 14th, 2009

Nikon has just announced a new entry level dSLR – the D5000.

It’s a cut down version of the very good D90 whilst adding delayed mirror drop down quiet mode, a flip out LCD which will be handy for video work but curiously, its self-portrait position is BELOW the camera and hidden behind your tripod!

Nikon and Canon have both started released dSLRs with video mode capability – but unless I am mistaken, these are quite crippled video modes, particularly when compared to a cheap digital video camera – no AF or AWB once recording has started, limited duration (5min on the D5000), mono audio with no wind cut and no facility for external stereo microphone. With the D5000, the video mode is a modest 1280×720 pixels at 24fps.

Compare this with the Panasonic GH-1 which allows full AF capability throughout movie mode including face detection AF, and wind cut noise reduction, and stereo audio, and external stereo microphone capability and ability to take full control of shutter speed during movie and movies at full 1920×1080x24fps or 1280×720x60fps AND it still operates as a 12mp digital camera with super quiet (no mirror bouncing around) still photography in a much more compact and light kit with 2 small lenses covering 14-280mm focal length range in 35mm terms.

Well let’s get back to the Nikon D5000 as a dSLR camera and see what its missing:

  • compared to its more expensive D90 sibling
    • crippled flash technology – no FP High Speed Sync and no remote flash capability
    • smaller viewfinder view – 0.78x magnification pentamirror vs 0.94x pentaprism
    • no in-body focus motor thus non-AF-S autofocus Nikkor lenses will not AF
    • no depth of field preview button
    • no multipower battery grip
    • 4fps burst rate not 4.5fps
    • LCD screen 233,000-dot instead of 920,000 as in D90
  • compared to the Olympus E620
    • crippled flash technology – no FP High Speed Sync and no remote flash capability
    • no depth of field preview button
    • no built-in image stabiliser
    • flip out LCD does not come out sideways for self portraits on a tripod as on the E620
    • limited creative “art” image editing options although there is a soft filter
    • only 1 cross-type AF sensor (E-620 has 7 cross-type), but the D5000 does have 11 in total

But if the sensor is as good as the Nikon D90, then image quality should be excellent, and if you are not shooting moving subjects then the video mode may come in handy for some things – although the whole point of movies is to shoot moving subjects!

And perhaps only the more enthusiastic amateurs who want to use off-camera flash or flash fill-in outdoors in the sunlight would miss the flash features.

Thus if you are a dedicated Nikon fan but can’t afford the D90 or don’t want its weight or bulk, then the D5000 may fit the bill.

For those keen on a real video experience with a still camera, then I would go for the GH-1 (it’s right up there on my list to buy next).

And if you really like doing self-portraits on a tripod – the Olympus E-620 or E-30 with its swivelling LCD might be the better choice.


Olympus 7-14mm – now if only I had the Olympus E-30

Written by Gary on April 13th, 2009

On my recent visit to Brisbane, I took this photo of the former Bank of NSW building using my Olympus E-510 with ZD 7-14mm.

As with most architectural style shots, one of the issues is getting the whole building in, while at the same time avoiding the building having converging lines.

I managed to almost achieve this using this lens with the sensor plane as parallel to the building as I could before everyone started walking across the road or a car came through. This would have been easier had I had the Olympus E-30 and its vertical electronic spirit level in the view finder!

I have not used any perspective control to straighten the lines (although I did rotate it a tiny amount – another reason for getting the Olympus E-30’s electronic spirit level!), and it has been converted to B&W and had general tonal adjustment and the sides cropped a little but no other PS work.

This image required the 7mm focal length (14mm in 35mm terms) to achieve without getting significant converging lines of the building. It could also be achieved using a wide angle tilt-shift lens but none are currently made for Four Thirds, or, of course, you could point your camera upwards and then try to correct it all in PS.

Brisbane Bank of NSW


White balance, digital photos of paintings, bushfires and Olympus dSLRs

Written by Gary on April 5th, 2009

Yesterday I had a couple of hours to kill in Brisbane, Queensland and so I thought a trip to the State art gallery would be worthwhile.

Fortunately, photography is allowed in permanent collections of most of Australia’s National and State art galleries, and for this, my favorite kit is the Olympus E510 (you could use E520/620/E30/E3 as they all have image stabiliser built in) and the Olympus ZD 50mm f/2.0 macro lens – you usually do need f/2.0-f/2.8 for hand held shots with IS at ISO 400 and the flat field of the macro dedication helps ensure that even at f/2.0, the corners remain in focus. In addition, this lens is one of the sharpest around, and has minimal barrel distortion.

If you have a Nikon dSLR then you could use their “VR-micro” lens which has image stabiliser built in.

If you use Canon, then you will have to resort to using a higher ISO – perhaps ISO 1600 with their 60 or 100mm f/2.8 macro lenses as unfortunately image stabilisation is not available either in the camera or in a Canon macro lens. If you use the 24-105mm f/4 IS L lens, you will probably need to use ISO 800 at least and then you have the issues with all the distortion this lens creates.

So, when I visit art galleries, I bring my Olympus E510 with 50mm macro lens.

As all paintings are lit by artificial light, and often do not contain any true neutral gray or white tones, you are unlikely to get accurate color renditions using auto white balance or white balance presets.

Luckily the Olympus dSLRs have a REALLY easy mechanism for doing custom white balance.

In the menu, set the Fn button to be custom WB.
Press the Fn button an it will tell you to aim camera at neutral subject (eg. white balance card) which is in the same lighting as your subject and take a photo. You will then be prompted to accept this.
Custom WB is set (don’t forget to revert to AWB when finished taking photos – just press WB button on rear and select AWB).

So let’s do a demonstration of what we can achieve:

Quite topically, there just happened to be a bushfire painting by Australian painter Russell Drysdale which was painted in 1944, so here is the first effort with auto white balance (AWB) on:

Drysdale awb

Now these colour look great but they are NOT how the painting really was – the sky was much more yellow in the painting. Time for custom WB. Unfortunately, I had forgotten to bring along my White Balance pocket cards so I had to do with using the white wall (almost certainly not photographically neutral but close enough hopefully).

Drysdale custom white balance

Now we are talking – although it still did not look exact on the camera’s preview, but on my laptop monitor it looks pretty close.

As an aside: unlike my Canon 1DMIII LCD screen, the Olympus LCD screen tends to correlate quite closely with how the jpeg will be, and usually I do not need to post-process the Olympus images as their in-camera jpeg image engine is superb – I can’t say the same for my Canon 1DMIII jpegs – I rarely use them and have to do lot’s of post-processing of Canon RAW files.

So here is a tip: if you don’t want to spend lots of time in front of a computer post-processing RAW files or you don’t know how to, strongly consider getting an Olympus dSLR just for that reason – not to mention a whole host of others – built-in image stabilisation, edge-to-edge image sharpness, compact & light size outfits, tilt-out LCD and with electronic spirit level (E-30) and weather-proofing (E-3).

None of these photos have been edited in Photoshop other than to crop and resize for web. You can click on them for larger view.

Lastly, here is a close up shot showing the beautiful detail in this work:

Drysdale custom white balance

There is a commentary on this painting provided by the NGV here.

More Australian paintings of bushfires:

More of my photographs of my favourite famous paintings – see here.


Olympus announces new dSLR the E-450 and firmware for E-30

Written by Gary on April 4th, 2009

The new entry level E-450 is an upgrade to the compact E-420 with:

  • Three Art Filters (Pop Art, Soft Focus and Pin Hole)
  • TruePic III+ processor
  • Increased continuous shooting buffer (8 RAW files, rather than E-420’s 6)
  • Improved screen (The luminance has been improved on the existing HyperCrystal II panel)

Unless you really couldn’t afford it, or the smallest size is really most important to you, I would still opt for the new E-620 over the E450 as the image stabilisation and other features make it a more versatile camera.

Olympus has also released a firmware update for the E-30 digital SLR. Version 1.1 rectifies minor issues with image playback and quietens operation of the Image Stabilizer when used with Imager AF and Hybrid AF modes of the camera.


Photo essay – Victorian bushfires 6 and 7 weeks after the devastation

Written by Gary on March 28th, 2009

Whilst most of us were not directly affected by the bushfires, we all have been horrified by the images that came from that day and the many eye witness accounts of lucky survival, and of those less fortunate.

The outpouring of empathy and compassion has meant many of us have donated hundreds if not thousands of dollars or, in many cases our free services to help rebuild the lives of those affected.

Understandably, the locals from the bushfire regions still in the grief phase from their losses are often polarised or at least have ambivalent emotions at the prospect of “outsiders” coming to their towns now that most of the roads have been opened to the public.

On the one hand, those lucky enough to still have ongoing businesses in the region are desperate for tourists to get back there so they can manage through these difficult times, as well as wanting the visitors to see for themselves how severely devastated the region was, and that it wasn’t just media hype.

Others, who are going through anger, blame or perhaps guilt phase of their grief reaction and who have little to directly benefit from outsider’s presence, may have a less than appreciative attitude to them even though these same people may have made personal financial contributions well in excess of what was expected. Many just want to be left alone, others apparently seem embarassed that their property is now a unsightly mess, while others have concerns that unscrupulous outsiders may want to exploit the conditions, steal from the damaged properties or just be disrespectful.

A local female photographer’s efforts to bring photo-tourists to the region provided they spend money there has highlighted the range of emotions currently evident towards the presence of tourists.

After posting this blog, The Age newspaper reported on a local who lost everything in the fire but decided to exhibit some of her burnt relics including a car which raised further emotions as to if it was too soon, or were the benefits in helping people come to terms with the tragedy more important.

But this event still remains as one of the most terrifying natural events in Australia’s history and warrants respectful documentation.

So with this background a friend and myself made two visits to the region over the past 2 weeks, ensuring we spent money there, and to be conservative, we decided not to photograph when others were around and only to take a couple of shots of actual house ruins, ensuring we did not trespass on any private property, while concentrating on the effect of the fire on the previously majestic rain forests which once were full of life.

If you want to see the human face of the tragedy, see ABC TV’s photo stories, videos, etc as I have purposely avoided this aspect to ensure I did not offend those still emotionally fragile in their grief.

It was interesting to see how differing intensities of the fires caused significantly different scars on the landscape.

The worst firestorms where even aluminium engine blocks melted, left the areas looking like a moonscape, barren grey ground with black trees – many of which had fallen – almost no leaves, no wildlife to be seen or heard even at 7 weeks apart from ants – and eeerily, not even the sound of a bush fly. The intensity of the fire will mean that it may take years before the chemistry of the top soil is restored.

NB. you can click on any of these images to see the larger versions.

firestorm

but in many areas, some of the trees had survived and were sprouting new growth, although the tree ferns were too incinerated to survive.

new growth at 6weeks

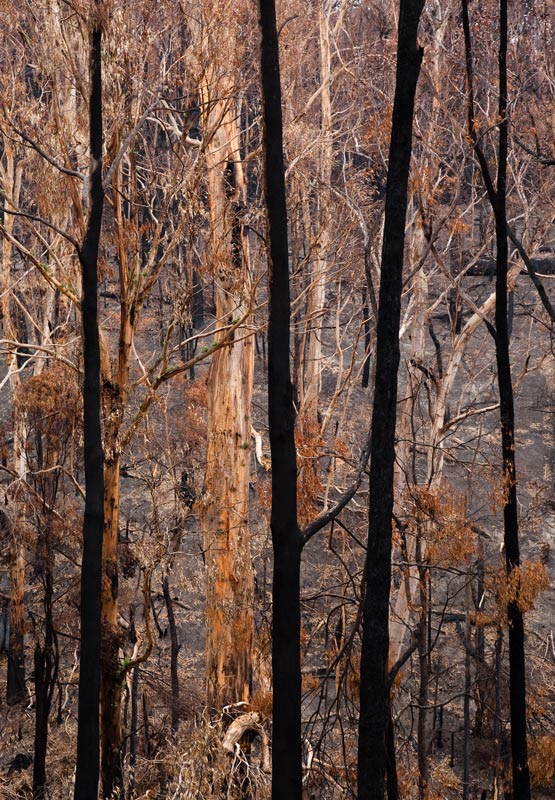
While in the tall wet sclerophyll forests where the destruction was similar, quite curiously, some of the Eucalypts seem spared (perhaps < 5%) despite adjacent trees being burnt from the bottom to their tops (for those not understanding the scale of these tall mainly 70 year old trees (the region was destroyed in the 1939 fires), the segments shown are probably ~50-80m tall in the image – to understand our forests more see my page here) – although we can expect new seedlings to start soon, it will take another 70 years for this forest to look like it was before the fire – and that assumes climate change does not prevent our current drought from breaking – Mountain ash do not regenerate after bush fires but they do produce seedlings and if there is adequate rainfall and no major bushfires, these will reach 100m tall and mature over 100-300 years.

black poles

While the majority of gullies were still barren at 7 weeks with no green to be seen, after some 80km of gravel roads, I found one gully with a dry creek bed where the tree ferns had sprung back to life:

tree ferns

and new shoots miraculously appearing from the ash:

shoots

“Fall leaves”:
Although it is early Autumn in Victoria now, our evergreen Eucalypt forests do not change foliage color significantly – but in the bushfire regions where not all the leaves were incinerated, the remaining foliage had died leaving many areas with trees like this and their forest floor littered with the falling dead leaves contrasted with the ash.

dead foliage

Some of the forests had an amazing but deadly beauty – I must have spent 10 minutes under the massive tree trunk balanced precariously, just ready to fall on my head without realising it was there (see image below). Tragically a fire fighter assisting with the clean up soon after the fires died from a falling tree – and this is a real risk to those who would venture there before the clean up is finished. See here:

falling tree

This particular forest near Toolangi was the only one where I heard a fly passing by, and the odd bird, while the bull ants were re-building their nests.

The fires tragically killed 173 people, and over 2000 houses were lost – but after visiting the once majestic forests where, in the worst affected, NOTHING survived apart from perhaps some ants – the deathly silence makes it easy to understand that over the extent of these fires, it is estimated that several million individual animals were killed or will perish because of the fires.

During the fires, even those who lost everything rushed injured wild life to aid suggesting to some that human spirit even in adversity is strongly linked to the welfare of animals.

After visiting the fires, I can’t help but feel for all those who were lost – both human and animal – just as when the planet Alderaan is destroyed in Star Wars – A New Hope, and Obi-Wan senses “a great disturbance in the Force, as if millions of voices cried out in terror and were suddenly silenced”. Please don’t take this as me being flippant, it’s just that this overwhelming sadness is what I feel when I’m there and this is what I thought of.

It is indeed a strange feeling one gets in the forests as your mind tries to put everything in its rightful place and imagine those creatures that once lived here only a few weeks ago.

It may be that some species unique to the area may have become extinct or close to it – hope is being held for the survival of Victoria’s state emblem – the lead beater possum which was only found in these areas.

If this has inspired you to go, please be respectful of the locals and their property, they need their space and need to feel secure, but the businesses also need you to keep them going, and above all, do not harm the fragile bush and be safe – Australian gum trees are well known for dropping large branches without warning, and now that risk is perhaps a 100-fold.

and this is a similar type of forest to what was devastated, they will be missed:

otways


Canon 5D MII has even stronger IR blocking filter than Canon 1DMIII

Written by Gary on March 27th, 2009

ADDENDUM: OOPS – well all may not be lost, re-tested today with Hoya R72 filter instead of Lee 730nm IR technical filter (which starts transmission at 730nm) and IR is possible with similar settings as for the Canon 1DMIII so I surmise that the Canon 5DMII has a stronger IR blocking filter than the Canon 1DMIII which prevents use of the Lee filter but still allows use of the Hoya R72 filter which starts transmission at 700nm, is 50% by 720nm and 85% transmission by 750nm.

Those who read my blogs and my web pages on IR will know that I love infrared photography – both film and digital (my digital IR photos here).

For digital I use the Olympus E510 (as you can even compose in bright sunlight with f/2 lens and live view BOOST), and the Canon 1DMIII.

Yesterday, my friend who has a Canon 5DMII asked me to help him do IR with it, but I found it was impossible using the Lee 730nm IR filter (marginally higher cut-off than a Hoya R72).

Using a Lee 730nm technical filter with Canon EF 24-105mm IS L lens, these are the results in bright sunlight in late afternoon to get adequate histogram on red channel:

Canon 1DMIII: ISO 400, f/5.6, 25sec – my usual exposure (similar to what I use with Hoya R72 on this camera).

Canon 5DMII: ISO 3200, f/4, 30sec – BUT the image was just a normal colour image with little if any Woods IR effect.

Thus I surmise that the IR blocking filter in the Canon 5DMII is so strong that almost NO IR light gets through it, and that using the Lee 730nm filter acts as a 26 stop neutral density filter.

This makes infrared photography impossible with this camera and the Lee filter without removing the IR blocking filter but fortunately the Hoya R72 filter does work.

Presumably the Canon 50D and 500D will have the same IR blocking filter.

Surprisingly, there are very few reliable reports on the internet via Google search to give examples of IR use.

If you feel like wasting your time reading through this thread on a dpreview.com forum which specifically asks if the 5DMII can do infrared, every response was it should, look what I can do with a Canon 10D or 40D – BUT NO ONE until my friend (sbolch) posted our experiments yesterday. I can see why I can’t be bothered wasting my time reading those forum threads anymore – if people don’t know the answer or can offer helpful advice then why do they bother posting?

The big question then becomes, will the Panasonic DSC-GH1 Micro Four Thirds digital camera with its much better video capability allow IR video and still photography – if anyone has the answers to that I would love to know!

While discussing the Canon 5DMII, another review of it has been published here.


dpreview.com’s in depth review of the Olympus E-30 dSLR

Written by Gary on March 25th, 2009

For my earlier blog on the E-30 and other reviews please see here.

see dpreview.com’s review.

Go to the conclusions, and not surprisingly, there were the usual cons attributable to Olympus and Four Thirds cameras’ smaller sensor – higher noise at high ISO, 1/2 stop less dynamic range in the highlights.

These are just the compromise for the many advantages this system offers and certainly not show stoppers for most people unless they value high ISO or need maximum dynamic range over the high optical quality edge-to-edge in a compact, light kit that Olympus offers.

The other negatives were rather minor and would not be major issues:

  • for white balance in artificial light, one should always use custom WB or incorporate a WB target in the image for RAW development rather than rely on presents or AWB – very few if any camera does well in all artificial light using AWB or presets so Olympus is not alone here.
  • the viewfinder has been made smaller than the E-3 to allow for a lighter, more compact camera – you can’t have your cake and eat it too – I have got used to the even smaller viewfinder on the E510 so it’s not a big deal.
  • the LCD resolution has not been updated to that of the competition – this is a pity but it won’t adversely affect your image quality – my main gripe with the Olympus camera LCD is the magnified view on playback uses a tiny jpeg so you don’t actually get to see the actual image quality at more than 7x magnification – I hope Olympus rectify this in future models if they haven’t already done so.
  • interestingly, the base ISO seems to have been lifted to ISO 200 which is similar to Nikon dSLRs for several years but a first for Olympus – personally I am not a fan of this but at least you can shoot at ISO 100 and it is one of the trade offs in sensor design for trying to improve high ISO performance
  • contrast detect AF in live view will always be slow with systems not fully designed for this such as all current dSLRs including Nikon and Canon. If you want faster contrast detect AF go for the new Micro Four Thirds system with its dedicated contrast detect AF lenses.

Now the negatives are out of the way, let’s look at the positives of the “best dSLR” Olympus has made – better handling than the weather-proof E-3 and with more features although obviously not weather-proof (presumably the E-4 will have the features of the E-30, plus E-3’s larger viewfinder and weather-proof body).

The most important positives which differentiate this camera from the Nikon and Canon dSLRs are:

  • availability of high quality dedicated lenses with edge to edge sharpness
  • built-in image stabiliser which will work with ANY lens even old manual focus lenses
  • swivel LCD with built-in horizontal and vertical leveling guide to assist in awkward or overhead camera positions to get those unique shots not easily possible with other cameras
  • built-in creativity of “art filters” and multi-exposure mode
  • superb jpeg image quality straight out of the camera without need for post-processing

BUT, if you already own a Canon 1DMIII like me for high ISO and speed in action photography and third party radio wireless TTL flash, the reason for having an Olympus is more about portability and hand held super telephoto reach, hand held macrophotography and creative angles – I would be swayed to go for the much cheaper E620 but the electronic spirit level functionality of the E-30 would come in handy for so much of my work that I think the extra weight of the E-30 might be worth it – pity Olympus didn’t put the spirit level into the E-620!


Even though I am also a Canon user, I would buy an Olympus E620 or E-30 over ANY current Canon or Nikon cropped sensor dSLR because of its image stabiliser and swivel out LCD and beautiful lenses.

And, if I wanted an interchangeable lens digital camera with video capability – then the new Panasonic G1H on which I previously blogged would easily beat any current and near future Canon or Nikon dSLR for video features and quiet mode.


20 minutes of photography – rural dreams – a little photo essay

Written by Gary on March 16th, 2009

I have created a short little photo essay derived from 10 minutes of urban photography last weekend and 10 minutes of rural photography this weekend.

Why only 10 minutes this weekend when I had 4 days down the coast with all my cameras?

Well, it started as a leave pass from my long suffering wife that I could go down the coast by myself for a photography trip for a few days…

but as time got closer, she decided that she could really do with getting away from it all as well and it was great to have her company…but….

whilst driving along en route and a small tornado appeared (we don’t get to see many here), I was under strict instructions – no Gary, you don’t need to stop the car and photograph it, and no, we are not going storm chasing, we are having a lovely weekend together.

at the destination on the coast, the sea fog had set in and it was almost dinner time and the local restaurants were soon to close…

I made quick decision, a 30min or so drive by myself up into the hills to get 10min of shots in a location I had scouted a year before.

My wife was happy to stay at the motel as I drove along the winding, wet road through the coastal hills and rainforests until I reached my destination, one of my favorite farm regions which I had always dreamed about but money, realities of life and family duties would mean I would never attain.

I quickly eye-balled a few shots that would fit my little theme all within 100m of each other, set my camera on manual exposure to combat the fog, then raced back down the hill to be ready for dinner.

As it turned out, it poured rain so heavily and consistently over the next 2 days that, combined with certain expectations, my inspiration for photographic creativity never returned.

So here is my little photo essay derived from the two weekends….

click on the door to enter:

door


Ballarat / Daylesford Foto Biennale – photographic exhibition

Written by Gary on March 16th, 2009

The Daylesford Foto Biennale photographic exhibition in Victoria, Australia has now been expanded under the umbrella of the Ballarat Foto Biennale and changed from Autumn to September with the next one being Sept 4th – Oct 4th 2009.

Another great event for the Melbourne region in September to coincide with AFL Australian Rules Football finals series, the Royal Agricultural Show, Spring Fashion in Melbourne, and precedes the Melbourne International Arts Festival and Melbourne Fringe Festival in October.

And of course, if you are going to Ballarat, you may as well take a week off and head further west and explore the wonders and Spring wild flowers of the Grampians and come back to Melbourne via the 12 apostles and the Great Ocean Road.

Now that is a nice trip, capturing some of the best photographic scenery Australia has to offer – Victoria’s historic gold fields with their artefacts, remnants of Victoria’s volcanoes (extinct for over 10,000yrs), and the natural beauty of the Grampians at their best, and the rugged shipwreck coastline with its beautiful Otways rainforest bush walks and waterfalls.

more photos of these regions:


Firmware update for Olympus ZD 9-18mm lens

Written by Gary on March 12th, 2009

Firmware update improves AF performance.

see firmware update