Panasonic GH-1 for HD sports video?

Written by Gary on July 20th, 2009

OK, the Panasonic GH-1 is NOT in the same league for video capability for sports when compared to a Sony EX-1, or a RED video camera, but then it is about 2-10% of the cost, size and weight of these cameras and so can play a significantly different role.

Last night, I decided to drop in on a night football game under lights and give the GH-1 a quick test to see how it would do under these demanding conditions.

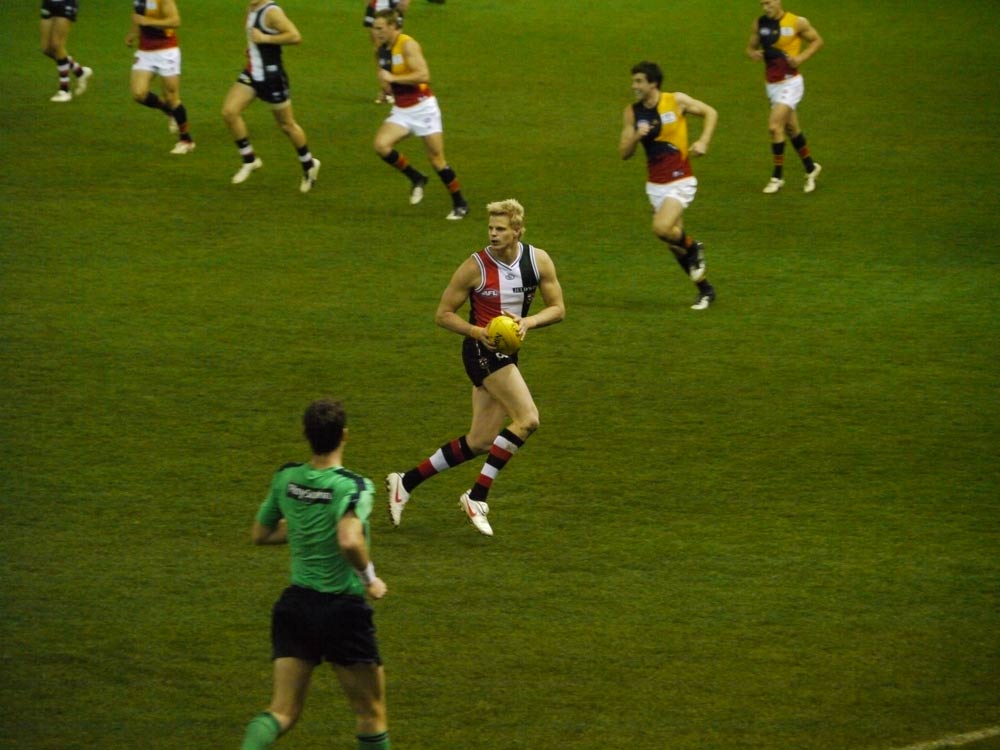
I was seated in the highest tier seats quite a long way from the action, and certainly not an ideal position – here is a shot from my seat using the GH-1 mounted to the Canon EF 17mm TS-E tilt shift lens (as usual click on it to open a larger image) – remember, in 35mm film terms, this is actually a 34mm field of view not 17mm – so you can see I was a LONG way from the action:

Etihad 17mm TSE

The first video I shot of the St Kilda players bursting through their banner at the other end of the ground – some 200m away, was unfortunately a bit jerky due to my poor panning technique hand held, BUT it shows how good the 2x digital zoom is in video mode. This video has a 35mm equivalent field of view the same as if one was using a 546mm f/5.8 super telephoto – but all I had was the compact, light GH-1 with Lumix 14-140mm HD lens – quite remarkable!

These videos were taken in motion jpeg at 1280×720 at 30fps then converted by YouTube into their format. Sound is via built-in mic. This was with v1.0 firmware – I have not yet updated this to v1.1 which should give even smoother movies and AF. Furthermore, the 720p AVCHD video mode with its 50 fps capture should give a smoother result for action as long as the panning is not too fast and there is not too much background detail (grass should be OK), as this combination causes artefacts in AVHCD.

PLEASE NOTE: If the videos look blocky on your screen, it is because of the YouTube conversion, and you certainly don’t get to see the videos how they appear on my computer at full 1280×720 resolution.

Panasonic GH-1 2x digital zoom = 546mm focal length

You would have to agree, very impressive for such a lens and telephoto reach.

At half-time I decided to walk to the bottom level and take a couple of shots from the back row.

First, here is an example of how surprisingly fast the contrast detect AF is. I saw the ball coming to my side of the ground and quickly turned the camera on (already zoomed to 140mm and in Manual metering mode at ISO 3200 with AF mode in single central AF area), and before I could see anything in the EVF I had half-pressed the shutter for a split second hoping AF would kick in, and then pressed the shutter. Not an ideal way to take a shot, but look how good it came out:

Lumix ISO 3200

Now, you have to admit, that is pretty good AF and what noise at ISO3200? Who cares about it?

When you can achieve this at 280mm telephoto reach with such a small package, noise at high ISO just doesn’t matter! The best camera will always be the one you bring with you.

Now for a demonstration of poor novice panning and with no digital zoom this time, but this video demonstrates that the GH-1 can AF for sports during HD video, and, with a little practice, you can manually zoom and then re-acquire AF. No dSLR such as a Canon 5DMII or Nikon D90/D5000 can do this (of course if the action wasn’t as fast and the people closer, I could have used face detection AF as well).

Panasonic GH-1 AF and zoom during sports video

So, if I can manage to do videos like these, anyone can!

One day I might learn a bit about videography and do some really nice videos and make use of the GH-1’s shallow depth of field and ability to use Lens Baby lenses, etc.

The firmware updates for the GH-1 and for the Lumix 14-140mm HD lens can be found here.

It would be nice if Panasonic would update firmware to add a few extra movie mode options:

  • improved AVHCD – using B-frames and perhaps option of higher bit rates than 17mbps
  • additional frame capture rates for ease in combining with other videos – eg. Sony Ex-1 offers 1920×1080 at 60i, 50i, 30p, 25p and 24p, while 1280×720 at 60p, 50p, 30p, 25p and 24p.
  • 1080 24P native recording mode
  • option to use fn button to toggle 2x digital zoom ON/OFF
  • ability to capture a still image even if mode dial set to creative movie – currently if you want to set aperture, shutter, ISO for movies, you must be in creative movie mode but this does not allow still image capture, you must move the dial to any other mode to allow this
  • live video out – so can use external device to monitor video capture
  • zebra feature and audio levels features as with the Magic Lantern unofficial Canon 5DMII firmware hack
  • see petition here
 

Panasonic GH-1’s 14-140mm premium kit lens – how does it compare?

Written by Gary on July 17th, 2009

The kit lens that comes with the Panasonic GH-1 is the unique Lumix G HD 14-140mm f/4-5.8 OIS lens which took over 12 months to develop to ensure it is optimised for silent contrast detect AF HD video with stepless aperture for smooth exposure adjustments, but how does it compare with similar 10x zoom lenses?

GH-1

Dpreview.com has posted test results of the Lumix lens here which shows that this is a very sharp lens for a 10x zoom, particularly in the 18-50mm range.

  • 28-280mm coverage, 62mm filter, HD AF video capable
  • 460g, 70x84mm
  • sharp across the frame especially from 18-50mm, even wide open
  • geometric distortion and CA is being corrected in Panasonic software, and is therefore negligible across most of the image range
  • 0.2x macro at 0.5m

Their summary states “The 14-140mm puts in a very good performance for a superzoom in our studio tests – it’s at its best in the 18-50mm range, but gets soft towards the long end of the zoom. It’s more or less on a par with the cream of the current crop of APS-C image-stabilised superzooms such as the Tamron 18-270mm F3.5-5.6 VC, and therefore marginally more consistent than the 18-200mm zooms from Canon and Nikon. Thanks to the use of software corrections, it registers minimal distortion or lateral chromatic aberration.”

It also easily beats the cheaper Sigma 18-200mm:

The Sigma 18-200mm f/3.5-6.3 DC OS HSM for cropped sensor Canon and Nikon dSLRs:

  • this lens was tested on a Nikon D300 by dpreview.com here
  • the lens gives 35mm coverage of 27-300mm on a DX camera, a little more range than the 28-280mm coverage of the Lumix, and with a touch more aperture at the wide end, but less aperture at the long end.
  • the Sigma lens obviously does not allow fast contrast detect AF in HD videos as the Lumix does, and weighs in at 600mg, considerably heavier than the Lumix, and is 79x88mm.
  • max. magnification is 0.26x at close focus of 0.45m
  • 72mm filter thread compared with 62mm on the Lumix
  • the tests show that from 2/3rds from the centre outwards, the Sigma is much softer than the Lumix at all focal lengths and apertures, except for a small range the Sigma lens is peaking at 50mm, but this marginally better performance contrasts with its poor sharpness from 80mm-135mm.
  • the Sigma also has twice as much CA at its widest focal length compared to the Lumix, although the GH-1 is correcting this in-camera

Canon EF-S 18-200mm f/3.5-5.6 IS:

  • 29-320mm coverage, 72mm filter, 600g, 79x102mm
  • generally soft corners, least sharp at 135mm
  • very high CA at each end of focal range
  • lots of complex barrel distortion at wide end, becoming pincushion, worst at 50mm, but reasonable at telephoto end
  • 0.24x macro at 0.45m but barrel distortion and corner softness

Tamron AF 18-270mm f/3.5-6.3 Di II VC LD Asph. IF Macro for Canon/Nikon DX:

  • 27-405mm on Nikon DX, 29-432mm on Canon APS-C
  • 0.32x macro at 0.42m, soft images although central sharpness at f/8
  • 72mm filter, 560g, 80x101mm
  • generally sharp across the range of focal lengths but CA a problem > 200mm
  • distortion is quite visible across much of the range.
  • spherical aberration also manifests as a significant focus shift on stopping down

Nikon 18-200mm f/3.5-5.6G IF-ED AF-S VR DX:

  • 27-300mm coverage, 0.26x macro to 0.5m but sharp only at f/11-16, 72mm filter, 560g, 77×96.5mm
  • see dpreview.com tests here
  • generally sharp but soft at 135mm, and significant CA at both ends of focal range
  • distortion is a problem at almost all focal lengths

Olympus ZD 18-180mm f/3.5-6.3 for Four Thirds:

  • consumer grade lens with 36-360mm coverage and 62mm filter, 440g, 78×84.5mm
  • the only zoom lens mentioned here that does not have optical image stabilisation capability – because Olympus builds this into nearly all of its bodies instead
  • 0.23x macro to 0.45m

THUS, by choosing the GH-1, you are definitely NOT losing any optical image quality compared to the other 10x dSLR zoom lenses, and in fact, you gain sharper corners, and you have a significantly smaller and lighter kit, and with AF-capable HD video to boot – its a win-win situation!

I often find myself thinking, why on earth am I carrying around this big, heavy Canon 1DMIII with EF 24-105mm f/4 L IS lens when in normal day conditions, I can get just as sharp, and probably sharper edge-to-edge images with better out of the camera jpeg colours with my Olympus E510 with kit lens?

Hopefully, the GH-1 will match the colours of the Olympus and prove to be an adequate replacement as a general walk-around kit, but I can’t see it replacing my Olympus E510 + ZD 50-200mm f/2.8-3.5 SWD combo – I just love that lens!

Of course, the Canon 1DMIII comes into its own for really low light work or action shots, as well as perhaps providing a little extra dynamic range and exposure latitude, but if you are shooting in normal conditions or with flash, why carry the extra weight?

I’m not the only guy that thinks this way – a must read series of blogs for all photographers is the one by Kirk Tuck, from Texas – you can find one of his blogs here and another here – just browse through his archive for more interesting insights.

Having said this, the 14-140mm lens does feel a bit big and heavy for the GH-1 body, and many may prefer an even more compact lens with less zoom, or, a prime lens such as the Olympus 17mm f/2.8 for MFT, or the soon to be released Lumix 21mm f/1.7 lens – either would be great for street photography.


Panasonic GH-1 with Canon EOS, Lensbaby and Olympus OM lenses

Written by Gary on July 16th, 2009

Still waiting on my Panasonic Four Thirds to Micro Four Thirds adapter, but I do have a Canon EOS to MFT adapter, and an Olympus OM to Canon EOS adapter, so I thought I would post a few pics of the various combinations – actual photos taken with the combos will come soon.

The Micro Four Thirds system is the ONLY system other than Canon EOS which can use Canon EOS lenses, although as there is no aperture control on these lenses you can only use them at wide open aperture, and in manual focus at 2x crop.

The Four Thirds system would require a 5.5mm adapter to allow infinity focus with Canon EOS and such a thin adapter is not able to be made, so for the time being, you can only get Micro Four Thirds adapters to allow EOS lenses.

A cool example, is using the brilliant new, and very expensive, Canon 17mm TS-E tilt-shift lens. This lens obviously is 17mm on a full frame dSLR, and becomes 22mm on my Canon 1DMIII, but having the GH-1, adds to its versatility by allowing it to be used as a 34mm tilt shift lens and with HD video capability.

17mm TSE

The Canon EOS 90mm f/2.8 TS-E tilt shift lens becomes 180mm focal length field of view and has potential uses for portraiture and macro work where one wishes to selectively focus on a subject by tilting the focal plane and giving nice bokeh.

90mm TSE

The LensBaby Composer with its movable central sharp region surrounded by blur in EOS mount works very nicely indeed and allows you to simplify your videos by blurring out unwanted distractions.

Lensbaby

Now, the nice compact Olympus OM prime lenses such as the OM 21mm f/3.5 which becomes a nice 42mm street photography lens.

OM21mm

I won’t bore you with the other nice OM options such as OM 50mm f/3.5 macro, OM 100mm f/2.8, OM 200mm f/4, but just for fun, here is the GH-1 with the Olympus OM 300mm f/4.5. Now, this becomes a 600mm field of view and should give good results at f/5.6. BUT, in addition, you can use 2x digital zoom in HD video mode to give 1200mm field of view – you might be wanting a tripod for this focal length reach though!

OM 300mm

While it may be most efficient to have just a EOS to MFT and a FT to MFT adapter, then use adapters for other systems which mate with EOS or FT, a more stable method is to just use one adapter in the train, and new adapters are appearing all the time for Micro Four Thirds such as Leica M, and just recently, Cosina have announced Nikon F and Pentax K adapters.

The Micro Four Thirds system is THE MOST ADAPTABLE digital camera system available because of its short lens flange to sensor distance – its just so versatile, and with the absence of the mirror, we should be getting a range of bodies with different designs and functions – I would love a silent electronic shutter version, and an infrared-enabled version in addition to the cool retro design of the Olympus E-P1.

John Foster has posted his tests of Olympus OM lenses on the Olympus E-P1 here – these should be similar to results on the GH-1.

If you want to see more images of MFT cameras using rangefinder lenses, see here.

For example, Panasonic G1 with M42 adapter, macro bellows, and Pentax Super-Multi-Coated Macro-Takumar 50/4:
Panasonic G1 with M42 adapter, macro bellows, and Pentax Super-Multi-Coated Macro-Takumar 50/4

This is one exciting system, I can’t wait until we get some more HD lenses, or at least a contrast-detect 50mm f/2.0 macro lens for nice portraits with AF.

Oh, and did I mention how much FUN this system is?


Tweaking the Panasonic GH-1 – a few tricks you should know

Written by Gary on July 15th, 2009

Even though I am able to use most cameras without reading the manual, I still go through it when I get a new camera (and usually BEFORE I buy a camera as it is there you will find the gotchas which may disappoint you).

First, let’s look at how I have decided to change the default menu settings of my new Panasonic GH-1:

  • Camera menu items:
    • QUALITY = RAW + best quality jpeg (if you are just playing with it, or memory space is a problem, you may decide on just best quality jpeg or RAW alone)
    • FACE RECOG. = ON – does not seem to impair AF performance, so let’s have it
    • FLASH SYNCHRO = 2ND (I prefer blurring of moving subjects to be behind them but for some situations, you may prefer 1ST)
    • ISO LIMIT = 1600 (you may prefer 800 instead)
    • EX.OPT.ZOOM = OFF – there are circumstances where turning this on may be useful – it will save you cropping your images and also allow more on your memory card – all it does is use the central 25% of the sensor (ie. gives ~3mpixel images) to give in effect a further 2x crop factor which turns the GH-1 with 14-140mm lens into a 3mp 54-546m zoom camera in 35mm terms. Of course, you could achieve this by cropping in Photoshop.
  • Movie menu items:
    • these will depend on your needs – AVCHD vs Motion JPEG, record quality, wind cut to reduce wind noise in the audio part of movies
    • AVCHD gives smallest file sizes for capture size but is more difficult to edit – 17Mbps 1080 50i or 720 50p HD video requires 8Gb for 1hr, 9Mbps 720 50p requires 4Gb per 1hr – most people will probably prefer to shoot at AVHCD 720p (SH level)
    • QuickTime Motion jpeg is easier to edit but 1280×720 30fps requires 16Gb for 1hr, VGA 640×480 30fps requires 6Gb per 1hr, and QVGA 320×240 30fps requires 2Gb per 1hr
    • digital zoom – I normally would NEVER use digital zoom on a camera BUT with the GH-1 in movie mode, at 2x, this does NOT result in substantial loss of quality when used for movies (BUT 4x zoom does lose image quality) – just remember to turn it off for still images! 1920×1080 HD video only uses 2mpixels of the 12 mpixel sensor, so the 2x digital zoom just uses the more central pixels and no quality is lost – now that is cool! The 14-140mm lens could become the 35mm equivalent of 54-546mm in movie mode how versatile is that for your wildlife movies?
    • you may want to set your preferred EXPOSURE MODE for when you use creative movie mode – this allows you to choose aperture-priority, shutter-priority, programme AE or manual exposure modes for your movies
      • for a filmic look, you may wish to set the shutter to 1/50th sec for 1080i or 1/120thsec for 720p or 1/60th sec for 30fps motion jpeg, set ISO to AutoISO, and if not using the HD lens, you may need to fix the aperture to avoid iris noise – in which case you should use a ND filter in bright conditions
      • if you are shooting in manual exposure, then, set the LIVE HISTOGRAM to be ON to help you adjust exposure by changing the aperture
      • for a cine look, Reichmann, suggests using Smooth Film Mode with -1 Contrast and -2 Sharpening
      • more video tips here
  • C wrench items:
    • AF/AE LOCK = AF – I prefer to be able to lock focus and not have to half-press shutter, and this setting allows the AF/AE LOCK button to do that
    • AF/AE LOCK HOLD = ON – this means you can release the AF/AE button and the focus will remain locked until you press it again which will unlock it and then re-enable the default half-press shutter AF option – very nice implementation indeed!
    • MF ASSIST = ON – actually this is default setting but its important to ensure it is on!
    • SHOOT W/O LENS = ON – this allows you to shoot with legacy lenses via adapters – just leave it set to on
  • Wrench items:
    • Clock set – you will actually be asked to set this when you 1st turn the camera on
    • Fn BUTTON SET = GUIDE LINE (ie. compositional grid but you may wish to set it to one of the other options)
    • BEEP = MUTE – I don’t need my camera making beeps everytime AF is attained
    • USB MODE = PC – This way when connected to computer it just opens as a drive automatically
    • AUTO REVIEW – REVIEW = OFF and ZOOM = OFF – this is quite important, as being an EVF, if you set either of these ON, it will mean you will be “blinded” for a few seconds after you take the shot as the viewfinder will display the shot you have taken unless you half-press the shutter.
  • Playback items:
    • ROTATE DISPL. = OFF – when I view an image on LCD, I want to see it as well as I can – rotating it for me is not a useful idea in my mind


Now, a few important tricks you need to know:

  • the front dial not only allows you to change aperture in mode A, or shutter speed in mode S, but by pressing it in, you can toggle it so that you can now change exposure compensation and this compensation effect is visible in the viewfinder. In Manual Mode, it toggles between aperture and shutter speed
  • MF assist – when using a compatible lens in MF mode, moving the focus ring will automatically activate magnified view for MF assist – very nice indeed! BUT, how do you activate it with a legacy lens using a lens adapter? Almost a simple but NOT intuitive – you press the left arrow button on the rear (which is also the AF mode selection button), then once the box is displayed, you can move it around using the arrow keys, then press SET button to enter magnified view, and you can further magnify it using the front dial. It works very well in reality. Nice!
  • moving the AF area – when using the single AF area, unlike the case with dSLRs where you have a limited selection of AF points, with the GH-1, you can move this area ANYWHERE in the frame, and what’s more, you can change its size! Just press the AF button on the rear, ensure single AF mode is selected, then press the down arrow button to enter the mode where the arrow buttons allow you to move the AF area, while the front dial changes its size. Press SET to return to normal camera function but with the AF area set. Very cool, especially for those using tripods!
  • Custom WB – press WB button, select either CWB 1 or CWB 2 option using arrow keys, aim camera at white subject lit by the light, press SET. Done!
  • DOF / shutter speed preview – depth of field (DOF) preview is easy – just press the aperture/rubbish bin button at bottom right on rear – but that’s not all folks, while in this mode, press the DISPLAY button and you get to see the effects of your selected shutter speed as well – up to 8 secs shutter speed – now that is almost fun!
  • Movie playback – go into PLAY mode by pressing the PLAY button next to viewfinder, select the movie to watch using left/right arrow buttons, then play movie by pressing the UP arrow button.

Face recognition AF:

  • if you have set face recognition AF to ON in the menu system, it becomes activated automatically if using either: iA exposure mode and a face is detected; portrait mode; or you specifically select face recognition AF mode using the AF button on the rear;
  • face recognition is surprisingly fast on this camera as long as the subject is not moving too fast, is in adequate lighting and is side on or front on to the camera, and not wearing glasses, and not too small on the screen.
  • you can register up to 6 faces and have the camera prioritise AF and metering for those faces, but registering faces may slow AF detection a little and may not distinguish close relatives.
  • it is very useful for movie mode when the last thing you want to do is to be adjusting focus yourself – just let the camera do it for you!

AF tracking:

  • this may be new for those coming from dSLR cameras and is only possible because of the fast contrast detect AF system in live view which the GH-1 is based upon.
  • you select this mode via the AF button on the rear
  • initially there is a central AF tracking frame which is white
  • adjust camera composition to place this frame on your subject then half-press shutter to lock onto the subject – the AF frame will then become yellow and the camera retains memory of the appearance of the object and the frame will move with the object, maintaining AF and optimising exposure for the object – very clever indeed!
  • if the object goes out of the image area, or you press AF button or SET button, or lock is not obtained initially (frame goes red), the lock is released and frame returns to its white status
  • if AF lock is not active, AF defaults to centre area AF
  • AF tracking lock may not occur if either:
    • subject is too small
    • subject is too dark or light
    • subject is moving too fast
    • background is similar color to subject
    • too much camera shake
    • when zoom is activated

Aspect ratio:

  • the GH-1 actually has a 14mp larger-than-usual sensor for a Four Thirds sensor which allows it to give you the option of various aspect ratios which can be VERY useful depending on your subject or the purpose of your prints:
  • default 4:3 aspect gives 4000x3000 pixels = 12 mpixels and is a nice ratio for most computer screens and its 1.33 ratio is close to the ratio of 8″x10″, 11″x14″ and 16″x20″ prints
  • 3:2 35mm film aspect gives 4128x2752 pixels = 11.4 mpixels and is a nice ratio for wide computer screens and its 1.5 ratio allows uncropped prints to traditional 35mm film print sizes of 8″x12″, 10″x15″, 12″x18″, 20″x30″ prints
  • 16:9 widescreen motion video aspect gives 4352x2448 pixels = 10.7 mpixels and is great for panoramas or display on wide TV screens but its 1.77 ratio may make it an issue to print
  • 1:1 square image gives 2992x2992 pixels = 9 mpixels but the only real advantage of using this is to save space on your memory card and to save having to crop in Photoshop, otherwise, you could achieve all this from a 4:3 aspect image and cropping it.
  • you can access this setting from Q.Menu button or by allocating it to the Fn button

Uploading GH-1 videos to YouTube:

  • according to this page, Youtube prefers video files to be uploaded as stereo audio, 1280×720 or 640×480 video in H.264, MPEG-2 or MPEG-4 codecs
  • the PhotoFunStudio software supplied with the GH-1 can trim your AVHCD videos and upload them to YouTube directly. AVCHD files are automatically converted to MPEG-2 while Motion Jpeg MOV files are uploaded unedited. Maximum upload is 100Mb or 10 minutes.
  • you can also directly upload motion jpeg .mov files via YouTube’s interface which allows max. 2Gb or 10 minutes – on my broadband, it uploaded at a rate of ~1.5Mb/minute
 

Finally, my Panasonic GH-1 has arrived – some initial impressions

Written by Gary on July 12th, 2009

After 1-2 months of waiting, I finally received my Panasonic GH-1 with Leica 14-140mm HD Mega OIS lens, but still waiting on my Four Thirds to Micro Four Thirds adapter and Leica 25mm f/1.4 FT lens.

It just happens that its arrival coincided with the extensive review of it by dpreview.com so I am not going to go into details you can otherwise get from there.

Aspects I love about the GH-1:

  • nice and compact and light – now I can look more under-stated, and can carry it with me to more places where a dSLR may not be acceptable or feasable
  • surprisingly fast contrast detect AF – at least as fast as entry level dSLR phase contrast AF and far more versatile with a very usable face detection or subject tracking system, and ability to AF on any part of the frame. Even more surprising, is how fast it is in low indoor light – as long as the subject is light coloured and with contrast with minimal movement (black hair in dim light is pushing it!)
  • a brilliant artificial intelligence system for novices – iA mode detects what kind of subject material (eg. face vs macro vs night scenario), applies the scene mode settings for that scenario and sets exposure for the subject taking into account subject movement in deciding on shutter speed – all just incredible!
  • very effective optical image stabiliser which works during movie mode
  • any camera mode can be used with movie mode – just press the movie button to start it and stop it – how simple is that – and with option of FULL controls over settings
  • incredible lens optimised for movie mode – silent AF during movies, step-less aperture to allow smooth exposure transitions as light changes during the movie, circular diaphragm for nice bokeh, 10x optical zoom (28-280mm in 35mm terms with clever option of 2x or 4x further movie zoom by sensor cropping without significant loss of image quality)
  • electronic viewfinder – the best out their on still cameras and essential for hand held movies
  • easy to learn control layout and very customisable settings – the perfect transition for those going from point and shoot to dSLR sophistication
  • the ability to use almost ANY lens EVER made on it – albeit in manual focus mode and no image stabilisation – and for Canon EOS lenses, only at wide open aperture as they do not have aperture rings
  • battery only takes 1hr to charge
  • excellent still image and movie quality with reasonably low noise at high ISO and more image detail with less aggressive anti-alias filter which should allow more detail from the lenses
  • swivel LCD and MUCH better design than that on the Nikon dSLR
  • ability to preview effects of exposure compensation, aperture and shutter speed on the image before you take the shot – very nice indeed!
  • customisable grid lines to help you compose and ensure camera is level
  • external mic port – an essential for quality audio in movies
  • the best implementation of live view and manual focus assist available

Aspects which I might miss or which disappoint me:

  • features available on the Olympus E-P1 Micro Four Thirds but not on the GH-1:
    • no CCD-shift image stabilisation option for non-optical IS lenses such as is the case with Olympus cameras – however, the Olympus E-P1 does not allow the IS to function during movie recording, so the optical IS during movie mode is as important feature – just a pity they couldn’t have put both options in!
    • no creative ART filters as with Olympus although it does allow tone control via “film” settings, and it does allow skin smoothing via one of the portrait settings, but it would have been nice to have movie mode with pin hole effects, etc as with the Olympus E-P1
  • digital zoom functionality – the 4x digital zoom is not really producing good image quality in either still or video modes, but the 2x digital zoom is quite useful in video mode, but not useful in still mode (as you can just crop in PS afterwards), thus personally, I would have preferred that you could have just enabled the Fn key to toggle 2x digital zoom for video mode ONLY on and off. When you are in 2x digital zoom mode for your videos and you suddenly want a still shot, it is a hastle to turn the digital zoom off.
  • mechanical shutter is noisy – I had hoped the lack of mirror would allow it to be almost silent, but the use of a mechanical shutter instead of an electronic shutter to ensure better sensor image quality has resulted in a still obvious shutter noise – and louder than I would like
  • no HDMI out DURING movie recording – this would have been nice
  • limited range of dedicated lenses for AF in HD video mode – but these will come, and soon, hopefully
  • the 14-140mm kit lens is a bit big and heavy for the GH-1 – but then it does replace two kit lenses – a 14-42mm and 40-140mm, and it is very sharp in the 14-50mm range and a unique lens which took 12 months to develop for movie mode
  • 62mm filter size of the 14-140mm and the Leica 25mm f/1.4 lens is not really standard compared with Four Thirds lenses which tend to be 58mm or 67mm
  • battery life not great but that is to be expected given its size and the need for EVF or LCD – buy an expensive 2nd battery BUT it must be a Panasonic one or the new firmware will not allow its use for “safety” reasons.
  • can’t charge a battery and use the charger to run the camera via DC at the same time
  • not weatherproof and not pocketable – well, you can’t have everything!
  • very expensive in Australia – $2999 will price it out of reach of most people, and why so high a price when the RRP is $US1499 and the $A is worth 80c US? Even with 10% GST added, it should be $A2061 – not $A2999! Maybe the price is subsidising the optional and fairly well priced 4 year extended Australian warranty which appears to be an additional $A100 according to the supplied leaflet
  • desperately needs a portrait and macro lens compatible with contrast detect AF, preferably an image stabilised HD movie compatible one – perhaps a 35-75mm f/2.8 macro or a revamped 50mm f/2.0 portrait macro and a 100mm f/2.8 macro for nature work. Please put a focal range limiter on it eg. full range, 1m to infinity, macro to 1m or whatever makes sense for that lens.

This has to be the most versatile, fun, take almost anywhere camera you can get your hands on, and with the best implementation of HD video movies to boot – bored with the kit lens? Just get an adapter an use an EOS or Nikon tilt shift lens, or Lens Baby, or any of the Four Thirds lenses (although only a few will contrast detect AF at this stage).

See more of my blogs on the Micro Four Thirds system here.


Struggling with video on the Canon 5DMII – help is at hand

Written by Gary on July 5th, 2009

There is no denying, that for all its faults, the Canon 5DMII, now with its firmware update to enable manual control of shutter, aperture and ISO during video, has become a popular dSLR video camera.

It allows high quality video with low image noise at high ISO, and shallow depth of field which is just not possible on consumer camcorders.

Unfortunately, though, its not really designed as a video camera which makes taking quality videos a touch more difficult – unlike the Micro Four Thirds options such as the Panasonic GH-1 and Olympus E-P1, there is no image stabilisation and no auto focus during video, furthermore there is no electronic viewfinder as on the GH-1, so you are forced to use the rear LCD screen which makes manual focus more difficult and perhaps worse, keeping the camera steady hand held, much more difficult.

Fortunately, there are some after market options which videographer Philip Bloom has just created a blog on and which I felt is worth mentioning here:

The Hoodloupe 3.0 and Zacuto Z-finder V2 – a couple of options to help you view the LCD screen in daylight and at the same time allow it to be held to the eye to help steady the camera.

See his blog here.


Short photo essay – Darwin in the dry season

Written by Gary on July 2nd, 2009

Last week I had the opportunity to grab a few days in Darwin, Northern Territory – one of the hottest and most humid cities in Australia – fortunately though, it was in the middle of the “Winter” dry season when temperatures are still in the low 30deg C range but conditions are much less humid and more bearable that the wet season.

As I only had a very brief stay and no opportunity to get to the main tourist attractions of Litchfield National Park (~2hr drive from Darwin) and Kakadu National Park (~4hr drive from Darwin), I decided to check out Darwin itself – a small city of some 120,000 population with a large 20-40 year old backpacker population which dominates the city, especially in the balmy evenings at the many open air pubs and cafes.

The local indigenous people were generally very friendly (although I did not try taking their photo without permission) and I was fortunate to learn much more of their culture, particularly their kinship system. Perhaps Western society could learn a thing or two from them!

I had planned to take a Panasonic GH-1 Micro Four Thirds camera along with me but this has still not hit the shelves in Australia!

I thus decided to take my Canon 1DMIII with my new Lens Baby Composer and a couple of other lenses – but this may be the last trip I take it with me – its just too heavy and too obvious that it becomes more of a liability and thus less capable as a street cam – I will probably stick with my Micro Four Thirds and Four Thirds Olympus gear for future travel unless I have a specific need for the Canon.

I couldn’t leave Darwin without a pic of a reptile, and rather than just take the usual old crocodile shots, I decided for something a bit different – a cute lizard:

lizard

There is no Photoshop applied to any of these images in this essay, just a bit of time choosing the correct lens focal length and position to get the background and composition just perfect.

Next was a trip to the famous Mindil Beach Markets which are open Thursday and Sunday nights each week. Thousands flock to these markets to try out the large variety of food stalls and then sit on the beach to watch the sunset, while the locals keep any stray crocodiles away.

Again, I didn’t want to join the thousands of others taking “normal” sunset shots, so I thought I would experiment to see what the Lens Baby could do (please click on the image to view a larger version to appreciate the Lens Baby effect – it is NOT just a depth of field effect BUT rather everything in the central zone is sharp – the guy’s hat and the clouds, while the surrounding areas blur rapidly):

Mindil beach 1

Here is another sunset shot, this time with the 50mm f/1.8 II lens focusing on one of the many Mindil Beach food staff chefs – perhaps cooking up a kebab of crocodile – which, by the way, tastes like a bland form of chicken.

cooking

For the photographers out there, don’t expect Darwin itself to offer many unique photographic opportunities – you will need to plan to get out of the city and spend 2 or 3 days in Kakadu, or at least a day trip to Litchfield. If you are into bird photography, I believe there are some local areas accessible by boat which may fulfill your needs as long as you don’t get taken by a large salty – salt-water crocodiles can be enormous – check out the one in crocodile cove attraction in Darwin!


Need high quality gigapixel automated panoramic imaging – try a GigaPan Epic 100

Written by Gary on June 30th, 2009

Forget your 25 mega pixel, full frame dSLR’s with their edge softness and tendency to vignetting.

Some people out there want to do the ultimate landscape shot – a panoramic stitch of dozens of images to create gigapixel images which are sharp edge to edge and with minimal vignetting and can be printed to wall sizes not just 20″x 30″.

Now, you could laboriously do this with a special panoramic stitching head and manually alter the camera’s view for each shot, but now there is an automatic robotic mechanism to make life so much easier (thanks Dean for alerting me to this product):

Epic 100
shutter mechanism

The GigaPan Epic 100:

  • for $US449 for this unit, you can sit this unit on a normal but sturdy tripod and attach a small dSLR (eg. Olympus E620 or Micro Four Thirds such as a G-1 or E-P1)
  • the camera needs to have focus set in manual, white balance set manually, exposure set manually – to ensure the camera does not make adjustments between frames
  • after a little calibration and adjustments to ensure the unit will take images with at least 30% overlap – well perhaps more than just a little – the unit has a mechanical mechanism which will depress the camera’s shutter button at programmed intervals and automatically move the camera for each shot
  • the unit also comes with its own software to stitch the images

Now, I haven’t tried this unit but it sounds a very interesting option and the small dSLRs, particularly the Olympus ones with minimal vignetting and edge to edge sharpness and presumably the even smaller Micro Four Thirds cameras will be the optimum cameras to use on such a system as their weight will be less likely to stress the mechanism.

Currently, there is no unit for larger dSLRs.

Check out these stitched infrared landscape shots taken by fellow Melbourne photographer here.


Micro Four Thirds – the digital revolution we have waited for

Written by Gary on June 22nd, 2009

The latest digital SLRs are great – high image quality, fast AF in low light, ability to use high ISO, great optical viewfinders, live preview for accurate manual focus, wide selection of lenses with remote TTL flash – there is a kit for almost every photographic need.

BUT there are a few problems with digital SLRs:

  • they are big and heavy – not the type of camera to take to social events or to work every day, nor even the best for travel unless you choose the lightest, smallest ones such as Olympus E620. The harder they are to hide, the more you may become a target for assault and theft which can be a big issue whilst traveling or even just walking the streets.
  • they are noisy – the inevitable clunk of the mirror going up and down makes them problematic in situations where such noises draw unwelcome attention such as wedding ceremonies, your daughter’s cello concert, etc.
  • they are unlikely to be optimised for realtime AF in HD video without substantial changes to their lens mount and lens AF architecture – something Canon and Nikon are not going to want to embark upon lightly!
  • despite their relentless push to ever more pixels and larger file sizes with their storage problems, the legacy lenses are not generally able to deliver the optical resolution to match the sensors resulting in little more detail than one would get from a 12mp sensor. This will require updating almost all lenses if one wants to make the most of the 20+mp sensors
  • high resolution images (eg 20+mp) require more than a 20+mp sensor and excellent optical resolution – they need close attention to focus accuracy as well as avoidance of camera shake or mirror vibrations – the higher the resolution to be attained, the more precise the photographer needs to be
  • the larger the image sensor, the lower the noise at high ISO and the more dynamic range, shallower depth of field but you are forced to have much bigger and heavier lenses, tripod heads and potentially worse edge-to-edge image quality as optical aberrations increase the further from the centre.
  • the requirement for a reflex mirror restricts their design options substantially and adds mirror vibrations and noise as mentioned above
  • What about the point and shoot cameras – they are small, light and silent?

    • their main problem is their tiny sensors which cause the following issues:
      • limited dynamic range
      • high image noise or low image detail at high ISO (> ISO 400)
      • inability to attain shallow depth of field for nice portraits
    • the lack of interchangable lenses means there is always a compromise on focal lengths available, how wide open the aperture can be, optical quality of lens, lack of capability for fun options such as lens baby or tilt shift lenses, and often inability to use filters such as polarising filters or neutral density gradient filters

    Now you should be able to see where the Micro Four Thirds comes into the picture!

    • A sensor 5x the size of a Canon G10 point and shoot sensor and only marginally smaller than a Nikon D90 or Canon 50D dSLR.
      • this gives you image quality comparable to dSLR image quality, and the ability to get shallow depth of field for portraiture (although not as shallow as with full frame dSLRs)
      • the sensor technologies can be shared with Four Thirds dSLRs for economies of scale as they can be the same sensors
    • the absence of a mirror means smaller size, more design options, no mirror vibrations to blur your image, no mirror noise to disturb the peace, and perhaps most important of all, a short sensor to lens flange distance which can make them a Universal Digital Back for almost any lens ever made and the potential to create tilt-shift adapters to have them all image stabilised tilt-shift lenses and can be used with HD video to boot! Just an incredible versatility that has been opened up because contrast-detect AF technology and image processing technology has improved sufficiently to allow these types of cameras to be produced. In a word – REVOLUTIONARY!
    • they fit into a system – they can use Four Thirds flash and lenses and thus can act as a backup camera when needed, and unlike a point and shoot, your lens investment goes with you to your next Micro Four Thirds body – indeed, you may have several Micro Four Thirds bodies each with different characteristics – a HD video camera vs a Leica-like street camera vs a truly pocketable camera vs a IR modded camera, etc.

Already we have 3 very useful Micro Four Thirds cameras and these are just the beginning!

  • Panasonic G1 – the first and extremely popular dSLR-like with swivel LCD and optical IS
  • Panasonic GH-1 – a G-1 with HD video and realtime AF during video with full control over camera settings during video, and importantly, an external microphone port
  • Olympus E-P1 – a slim design with built-in image stabiliser but without EVF but optional optical viewfinder – this is perfect as a Universal Digital back for whatever lens you wish to throw at it!

But won’t Canon and Nikon just make the same type of camera in their cropped sensor or even full frame sensor format?

  • whilst Canon and Nikon have led the way in sensor technology, low noise at high ISO, and up to a few years ago, auto-focus technology, their approaches to camera design have hardly been inspiring, and many of their new important dSLR features have been adopted from Olympus such as sensor dust protection, live preview and I would expect, one day they will finally realise they can’t do without in-camera image stabilisation or a mirror-less large sensor camera.
  • unfortunately, for Canon and Nikon, their technology investment in cropped sensor dSLRs means that if they stay at that sensor size, they will never be able to compete with Micro Four Thirds when it comes to pocketability, and perhaps for edge-to-edge optical quality, but in the meantime sensor technology will be improving each year so that sensor quality differences between a 2x cropped sensor as on Micro Four Thirds vs 1.6x cropped sensor on the Canons becomes even moe negligible – why carry around something bigger and heavier if it isn’t going to take substantially better photos?

My personal feeling is that Micro Four Thirds format has hit a sweet spot and things will only get better as technology improves.

And importantly, it means that for Panasonic and Olympus , they can sell more cameras and grab market share from point and shoot as well as entry level dSLR buyers as long as they keep it price competitive. The bottom line is, if they can turn these into a profit, then they will keep making these innovative solutions and we all win.

Sure, there will still be a large market for dSLRs, and Micro Four Thirds will not be the solution for many photographic needs such as action or sports photography or high resolution fashion work, but for the rest of us, they sure do fill a nice niche.

I am looking forward to what they can come up with next.

Here are some of my previous blogs on the Micro Four Thirds.

Don’t take my word for it though, search the web to see what others are saying, for example, Ken Norton’s opinion on the zone-10 blog which are similar to mine although we differ a little – I don’t really care that I am not going to get 20+mp on these MFT cameras – if I want high resolution, I will get a full frame or even a medium format dSLR but that won’t be pocketable or portable. I think Olympus and panasonic have got it right – concentrate of image quality and functionality and accept that 12mp is probably the best sensor resolution for this type of camera.


The new Canon 17mm tilt shift lens on a Canon 1DMIII

Written by Gary on June 21st, 2009

I had the opportunity to have a play with the very expensive ($A3500) and heavy, unique Canon EF TS-E 17mm tilt shift lens yesterday – albeit, on my 1.3x crop Canon 1DMIII.

Although in essence it presumably gives an angle of view of 17×1.3 = 22mm on the Canon 1DMIII, it’s shift capabilities allows one to gain some nice images without having to resort to convergence correction in Photoshop.

The 17mm f/4 TS-E tilt shift has an unprotected protuberant front element which means filters are not possible and it does not come with a lens hood, which would have been nice – at least to protect accidentally hitting the front element while walking.

17mm TS-E

So let’s have a look at what it’s shift functionality can achieve:

Firstly, let’s look at the results we get using it as a normal wide angle lens to capture Melbourne’s Etihad football stadium – although many of the building lines are not truly vertical due to the round shape of the stadium, the necessity of angling the camera upwards creates distortion. This distortion can be corrected in PS but at loss of detail and loss of pixels from cropping.

usual convergence style

usual convergence style

Now, without any shift still, but this time keeping the camera sensor perpendicular to the ground to ensure vertical lines remain vertical. Now lines are vertical, but you don’t get to see much of the stadium.

vertical lines no shift

vertical lines no shift

NOW, we get to see the beauty of the shift lens, keeping the camera positioned as for the above shot we can now elevate the lens using the shift knob until we get the top of the roof in. As we have kept the sensor perpendicular to the ground, the vertical lines remain vertical.

lens shifted upwards

lens shifted upwards

And just to show how much we could get in if we shift fully downwards with camera still in same position, you can see how useful this technique could be for creating 3 overlapping images for stitching into a panoramic image.

lens shifted down

lens shifted down

I have purchased an EOS to Micro Four Thirds adapter and am looking forward to using this lens on my new Panasonic GH-1 when it finally arrives – I have some uses for having a 34mm equivalent tilt lens using the GH-1’s HD video with external microphone.

Now to wait for an EOS to Four Thirds adapter so I can use this on my Olympus E510 as well and have it as an image stabilised 34mm tilt shift lens!

Olympus have not yet made any tilt-shift lenses for their digital systems – perhaps they have an even better plan – tilting the sensor to make all lenses into tilt lenses, or with Micro Four Thirds, it would be easy to make a tilt-shift adapter so nearly all lenses become tilt-shift lenses?

See my blog on this here.